The VBA To Query a SQL Server Database
The following VBA Function can be used from within an Excel VBA Project. You will, however need to add the ADODB library to the project first.
In this example we use an ADO connection to connect to a SQL Server instance (DBSRV\SQL2014):
- The Provider parameter indicates that an OLDEB connection will be established and the Data Source parameter points to the SQL Server Instance.
- The Initial Catalog parameter identifies the database to be queried (AdventureWorks2014)
- The Integrated Security parameter indicates that Windows Authemtication will be used to authenticate with SQL Server.
A RecordSet object (rs) is used to create a record set from a SELECT statement:
The SELECT statement is constructed from a literal string and the value for the variable intID that is passed into the function when it is called.
The If statement at the start checks for an intID value of 0. Integer variables default to a value of zero if not initialised (in other words if no value is provided when the function is called). If no value is passed in to the function a value of 0 is returned as the revenue value.
The second If statement tests for a non numeric value being returned by the SELECT statement. If a customerID passed in to the function is valid, but they have plaved no orders the SUM(TotalDue) expression will return a NULL value. If this happens then the funvtion will return a value of 0 instead.
The NULL value scenario can be seen in the following screen shot.
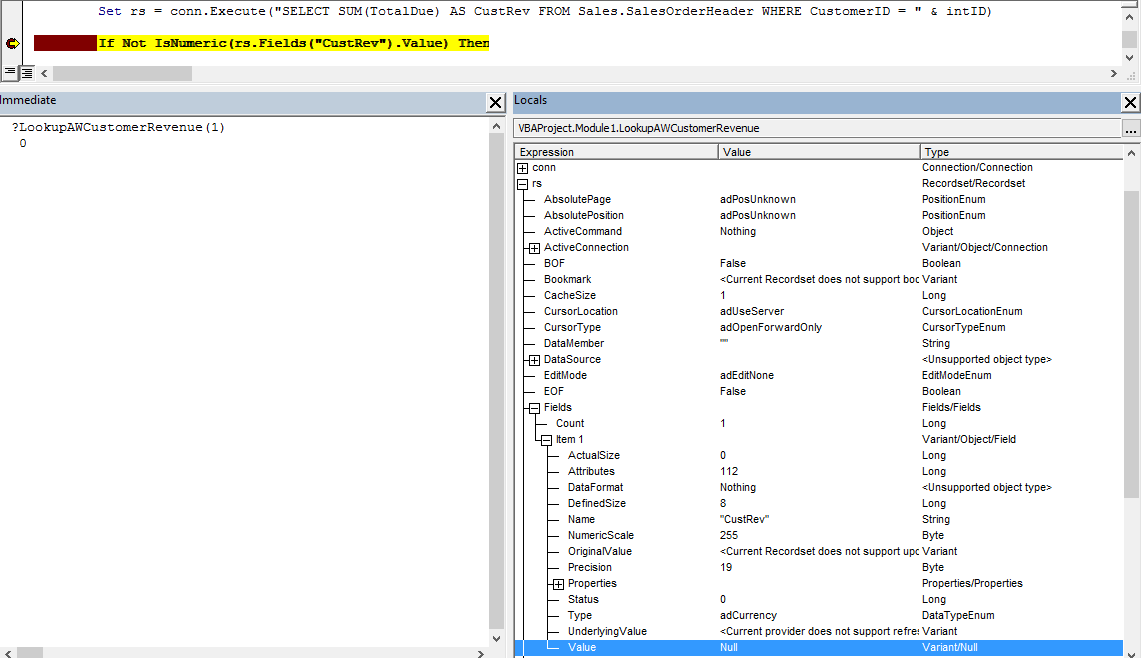
I placed a breakpoint on the line of VBA code containing the If statement and opened the Locals Window so that I could see all the variable values at that point of execution.
I tested the function by executing it from the Immediate Window in the VBA editor:
With a breakpoint set the code execution automatically stops at the marked line and enables us to view the environment at that point of execution.
The Locals Window in the above screen shot shows the Recordset object variable rs, and specifically the value for the first field from rs, “CustRev”. We can see that it is set to Null. This is because a Customer with CustomerID value 1 has not placed any orders and, therefore, has no resulting revenue value.
The following screnn shot shows that the query returns NULL when run directly on the SQL Server instance:

Assuming that a valid CustomerID is passed into the function and a non NULL value is returned by the SELECT statement, the function will return the total sales revenue for that customer as a currency value.

Manipulating Excel data via a linked server
We can now link to the created Excel file as follows.
|
1 |
EXECsp_addlinkedserver’CambridgePubDatabase’, @srvproduct=», @provider=’Microsoft.Jet.OLEDB.4.0′, @datasrc=’C:\CambridgePubs.xls’, @provstr=’Excel 8.0;’ GO EXECsp_addlinkedsrvlogin’CambridgePubDatabase’,’false’ GO |
To drop the link, we do this!
|
1 |
—EXEC sp_dropserver ‘CambridgePubDatabase’, ‘droplogins’ — Get the spreadsheet data via OpenQuery SELECT*FROMOPENQUERY (CambridgePubDatabase,’select * from ‘) GO —or more simply, do this SELECT*FROMCambridgePubDatabase…CambridgePubs |
So now we can insert our data into the Excel spreadsheet:
INSERT INTO CambridgePubDatabase…CambridgePubs
(Pubname, Address, postcode)
SELECT Pubname, Address, postcode FROM ##CambridgePubs
| 1 |
07 Aug 3 Ways to Perform an Excel SQL Query
Posted at 12:08h
in Excel VBA0 Comments
Howdee! Excel is a great tool for performing data analysis. However, sometimes getting the data we need into Excel can be cumbersome and take a lot of time when going through other systems. You’re also at the mercy of how a disparate system exports data, and may need an additional step between exporting and getting the data into the format you need. If you have access to the database where the data is housed, you can circumvent these steps and create your own custom Excel SQL query.
To follow along with my below demos, you’ll need to have an instance of SQL server installed on your desktop. If you don’t, you can download the trial version, developer version, or free express version here. I’ll be working with the free developer version in this article. I’m also using a sample database that you can download here. The easiest way to install this is using SQL Server Management Studio (SSMS). That download is available here. Once you open SSMS, it should automatically detect your local server instance. You must ensure your SQL Server User is running as the “Local Client” and then you can create a blank database, and restore that database from the backup file. If you have issues accomplishing this, let me know in the comments and I’ll elaborate on how this is done.
If you are familiar enough with SQL and have access to your own data, you can skip these steps and use your data. Otherwise, I recommend downloading these tools before getting started. If you’re new to SQL, I highly recommend the SQL Essential Training courses on Lynda.com. Now, on to why you’re all here…
Какие виды СУБД бывают и чем они различаются
Существует много видов и классификаций СУБД. И каждый из них подходит для разных типов баз данных. Но хорошая новость в том, что базовый уровень SQL везде одинаковый. И если научитесь основам языка, вам будет легче перейти с одной СУБД на другую. Нельзя сказать, что они идентичны, но очень похожи.
Например, БД классифицируют по количеству пользователей, типу хранимых данных, их структурированности или месту расположения. Давайте разберем по порядку.
По количеству пользователей:
- Однопользовательская, в которой одновременно может работать только один специалист
- Многопользовательская — в ней одновременно работает большое количество пользователей.
По типу языка запросов:
- С поддержкой SQL, в которой данные хранятся в таблицах
- С поддержкой NoSQL — нереляционные СУБД, где действуют языки запросов, основанные на программировании и предназначенные для работы с большими БД.
По принципу хранения базы данных:
- Централизованная (локальная), где все данные расположены на одном сервере
- Распределенная, в которой данные хранятся на разных серверах, в том числе и облачном (Yandex Object Storage и прочие).
По видам информации, которую можно хранить в базе данных:
- Специализированные — содержат данные по конкретной теме
- Универсальные — хранят данные из разных областей.
По типу использования базы данных во времени:
- Оперативная (транзакционная, производственная) — для повседневных операций
- Аналитическая — для хранения и расширенного анализа данных, к примеру, бизнес показателей.
По степени структурированности данных:
- Неструктурированные хранятся в необработанном виде и формате
- Полуструктурированные обработаны лишь отчасти
- Структурированные — отформатированный вариант неструктурированных данных.
По типу хранения, запроса и обработки данных в базе:
Еще системы управления базами данных делятся на платные и бесплатные, кроссплатформенные или те, которые работают, например, только на Linux или мобильных устройствах. Есть те, что легко встраиваются в приложения, и другие — большие и с целым комплексом операций для установки.

Например, в приложение о питании нет смысла встраивать систему управления базами данных, предназначенную для обработки огромного количества информации. И наоборот — в корпоративной системе необходимо использовать большую транзакционную СУБД.
SQL Server Data Import to Excel using QueryTable
Function ImportSQLtoQueryTable
The function creates a native Excel QueryTable connected to the OLE DB data source specified by the conString parameter.
The result is nearly the same as using the standard Excel connection dialog box.
Function ImportSQLtoQueryTable(conString As String, query As String, target As Range) As Integer

    On Error Resume Next

    Dim ws As Worksheet
    Set ws = target.Worksheet

    Dim address As String
    address = target.Cells(1, 1).address

    ' Procedure recreates ListObject or QueryTable

    If Not target.ListObject Is Nothing Then     ' Created in Excel 2007 or higher
        target.ListObject.Delete
    ElseIf Not target.QueryTable Is Nothing Then ' Created in Excel 2003
        target.QueryTable.ResultRange.Clear
        target.QueryTable.Delete
    End If

    If Application.Version >= "12.0" Then        ' Excel 2007 or higher
        With ws.ListObjects.Add(SourceType:=0, Source:=Array("OLEDB;" & conString), _
            Destination:=Range(address))

            With .QueryTable
                .CommandType = xlCmdSql
                .CommandText = StringToArray(query)
                .BackgroundQuery = True
                .SavePassword = True
                .Refresh BackgroundQuery:=False
            End With
        End With
    Else                                          ' Excel 2003
        With ws.QueryTables.Add(Connection:=Array("OLEDB;" & conString), _
            Destination:=Range(address))

            .CommandType = xlCmdSql
            .CommandText = StringToArray(query)
            .BackgroundQuery = True
            .SavePassword = True
            .Refresh BackgroundQuery:=False
        End With
    End If

    ImportSQLtoQueryTable = 0

End Function

' Source: http://support.microsoft.com/kb/816562

Function StringToArray(Str As String) As Variant

    Const StrLen = 127
    Dim NumElems As Integer
    Dim Temp() As String
    Dim i As Integer

    NumElems = (Len(Str) / StrLen) + 1
    ReDim Temp(1 To NumElems) As String

    For i = 1 To NumElems
       Temp(i) = Mid(Str, ((i - 1) * StrLen) + 1, StrLen)
    Next i

    StringToArray = Temp
End Function
Code comments:
- The query parameter can contain a SELECT or EXECUTE query.
- The resulting data will be inserted starting from the top left cell of the target range.
- If the target range contains a ListObject or QueryTable object, it will be deleted, and a new object will be created instead.
If you need to change the query only, just change the QueryTable.CommandText property. - Pay attention to the .SavePassword = True line.
Microsoft Excel stores passwords without encryption.
If possible, use the trusted connection. However, it is not supported by Microsoft Azure SQL Database yet.
Test Code of SQL Server Data Import to Excel using QueryTable
Sub TestImportUsingQueryTable()

    Dim conString As String
    conString = GetTestConnectionString()

    Dim query As String
    query = GetTestQuery()

    Dim target As Range
    Set target = ThisWorkbook.Sheets(1).Cells(3, 2)

    Select Case ImportSQLtoQueryTable(conString, query, target)
        Case Else
    End Select

End Sub
The IDE
The ability to run SQL queries is great, but for this functionality to be truly useful, the code editing experience must be convenient and pleasant for the user.
This is where QueryStorm’s code editor shines with advanced features such as:
- code completion
- syntax highlighting
- error highlighting
- bracket matching
- code snippets
- code formatting
- star expansion
 Snippets, syntax highlighting, code completion, error highlighting
 Column disambiguation
 Star expansion
These features make for an excellent user experience, but they also help non-technical Excel users who are interested in learning SQL. The ability to work with data both from the Excel user interface as well as from code, coupled with IDE features such as code completion makes QueryStorm an excellent tool for teaching and learning SQL.
Как работать с надстройкой:
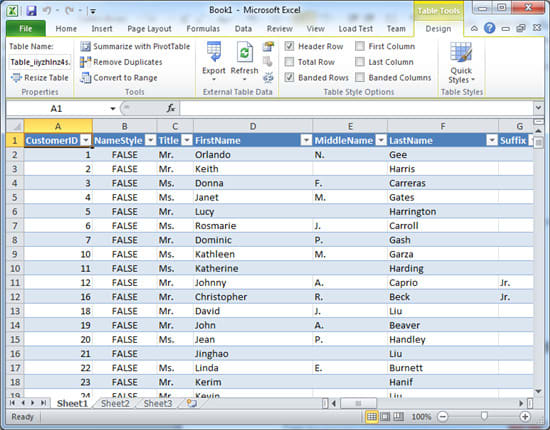
Как превратить данные Excel в реляционную базу данных и подготовить их к работе с SQL запросами
По умолчанию Excel воспринимает данные как простые диапазоны. Но SQL применим только к реляционным базам данных. Поэтому, прежде чем создать запрос, преобразуйте диапазоны Excel в таблицу (именованный диапазон с применением стиля таблицы):
Как создать и выполнить запрос SQL SELECT к таблицам Excel
Надстройка «SQL запросы» позволяет выполнять запросы к Excel таблицам на разных листах и в разных книгах. Для этого убедитесь, что эти книги открыты, а нужные данные отформатированы как именованные таблицы.
Операторы Left Join, Order By, Group By, Distinct и другие SQLite команды в Excel
XLTools использует стандарт SQLite. Пользователи, владеющие языком SQLite, могут создавать самые разнообразные запросы:
Совет: вместо набора названий таблиц вручную, просто перетягивайте названия из дерева данных в область редактора SQL запросов.
Как объединить две и более Excel таблиц с помощью надстройки «SQL запросы»
Вы можете объединить несколько таблиц Excel в одну, если у них есть общее ключевое поле. Предположим, вам нужно объединить несколько таблиц по общему столбцу «КодТовара»:
Появились вопросы или предложения? Оставьте комментарий ниже.
Running SQL Queries in Excel
One might wonder if it’s possible to utilize SQL in Excel. The answer is yes! In fact, running SQL queries in Excel can be a powerful way to manipulate and analyze data. This section provides a brief overview of various methods to run SQL queries within Excel, speeding up data analysis and visualization.
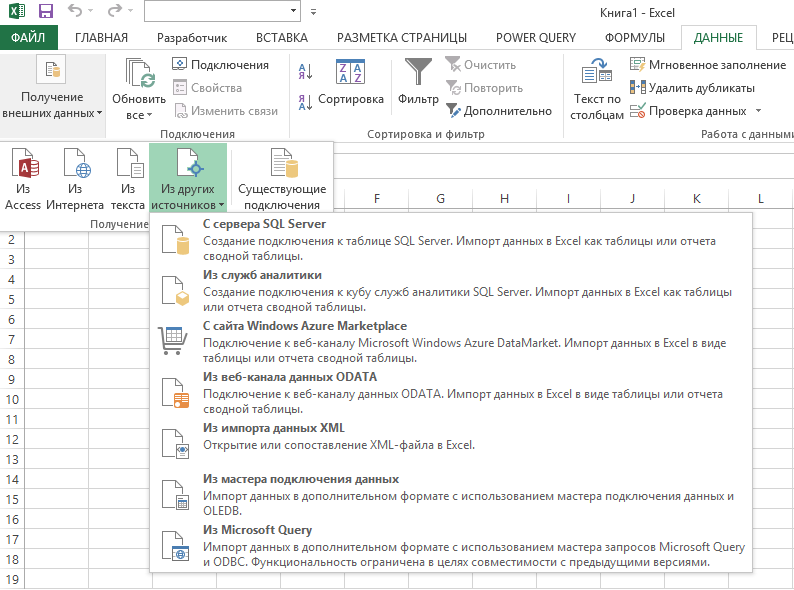
One popular method to run SQL queries in Excel is by using Microsoft Query. This built-in tool comes with most versions of the Excel software. Microsoft Query provides an easy means to create and edit SQL statements, and retrieve data from various sources, such as SQL Server databases or ODBC data sources. To utilize Microsoft Query, follow these steps:
- Click on the “Data” tab in Excel.
- Select “Get External Data”, then “From Other Sources”.
- Click on “From Microsoft Query” and select the desired data source.
Another method involves adding a Power Query add-in to Excel. This powerful tool allows users to create and modify data queries directly within the Excel environment. While a bit more complex than Microsoft Query, Power Query offers greater flexibility. To get started with Power Query:
- Install the Power Query add-in (if not already present).
- Click on the “Data” tab in Excel.
- Select “Get Data” and choose the preferred data source.
For those preferring the use of VBA (Visual Basic for Applications), a third option exists. By leveraging VBA code, it’s possible to connect to a database, execute SQL queries, and retrieve results. However, this method requires some familiarity with VBA programming and might be better suited for advanced users. Sample VBA code for running SQL in Excel can be found easily through various online resources and tutorials.
When working with SQL in Excel, there are a few basic tips to keep in mind:
- Be mindful of data source limitations when querying large datasets.
- Pay close attention to data format and structure, as incompatibilities can lead to query failures or inaccuracies.
- Make use of native Excel functions and features in conjunction with SQL queries to enhance the power of your data analysis.
In summary, Excel provides several ways of running SQL queries, depending on the user’s preference and expertise. By leveraging tools like Microsoft Query, Power Query, or even VBA code, one can use SQL in Excel to optimize data analysis and generate valuable insights.
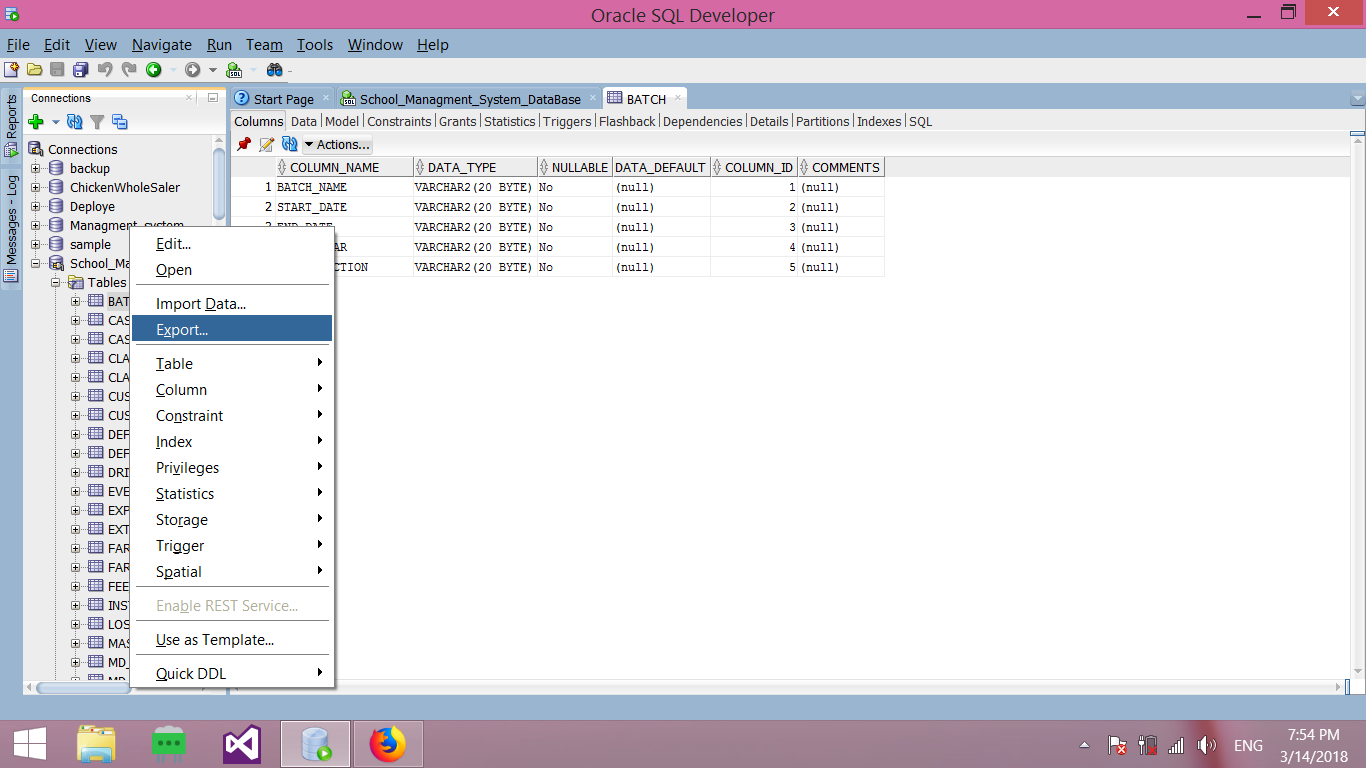
Create Excel File from SQL Table
For this example, I will export data from the authors table
to an Excel file.
The first step is to create the Excel file.
When working with Excel, we need the
following namespace:
using Excel = Microsoft.Office.Interop.Excel;
The Excel file will be created on the desktop. If a previous file with the same
name exists, it will be deleted first and then the new file is created.
string fileName = Environment.GetFolderPath(Environment.SpecialFolder.Desktop) + "\\" +    "ExcelReport.xlsx";Excel.Application xlsApp;Excel.Workbook xlsWorkbook;Excel.Worksheet xlsWorksheet;object misValue = System.Reflection.Missing.Value;// Remove the old excel report filetry{    FileInfo oldFile = new FileInfo(fileName);    if(oldFile.Exists)    {        File.SetAttributes(oldFile.FullName, FileAttributes.Normal);        oldFile.Delete();    }}catch(Exception ex){    MessageBox.Show("Error removing old Excel report: " + ex.Message, "Error",        MessageBoxButtons.OK, MessageBoxIcon.Stop);    return;
}
We create the Excel file using code like this:
xlsApp = new Excel.Application();xlsWorkbook = xlsApp.Workbooks.Add(misValue);xlsWorksheet = (Excel.Worksheet)xlsWorkbook.Sheets;// Create the header for Excel filexlsWorksheet.Cells = "Example of Excel report. Get data from pubs database, table authors";Excel.Range range = xlsWorksheet.get_Range("A1", "E1");range.Merge(1);range.Borders.Color = Color.Black.ToArgb();range.Interior.Color = Color.Yellow.ToArgb();dynamic dbschema = new JObject();
For this file we create a header first. The header is one line which
describes the content of the file, displayed in a different color, and for each
column of the table we will have the column name as the column header in the Excel file.
You can choose something different, according to your needs.
As you can see, the «general» header will not fit in column A (it
is too long) and we don’t want to enlarge column A to fit it. I choose to
merge several cells from the first row, such that the header spans over those cells.
The next step is to export the table to an Excel file. This can be done with the following
code:
using SqlConnection conn = new SqlConnection(connectionString);conn.Open();using SqlCommand cmd = new SqlCommand(sqlselect, conn);using SqlDataReader dr = cmd.ExecuteReader();if(dr.HasRows){ for(int j = 0; j < dr.FieldCount; ++j) { xlsWorksheet.Cells = dr.GetName(j); } ++i;}while(dr.Read()){ for(int j = 1; j <= dr.FieldCount; ++j) xlsWorksheet.Cells = dr.GetValue(j - 1); ++i;}
In the for loop, we fill in the column headers in the Excel file and
export the data.
Because some of the data in the same column might be wider that others (this
usually happens with text cells), we will set the properties of each column to
auto fit the largest cell in each column:
range = xlsWorksheet.get_Range("A2", "I" + (i + 2).ToString());
range.Columns.AutoFit();
The last step is to save the Excel file and to release the resources the Excel object
uses:
xlsWorkbook.SaveAs(fileName, Excel.XlFileFormat.xlWorkbookDefault, misValue, misValue, misValue, misValue, Excel.XlSaveAsAccessMode.xlExclusive, Excel.XlSaveConflictResolution.xlLocalSessionChanges, misValue, misValue, misValue, misValue);xlsWorkbook.Close(true, misValue, misValue);xlsApp.Quit();ReleaseObject(xlsWorksheet);ReleaseObject(xlsWorkbook);ReleaseObject(xlsApp);
At the end we can ask the user if they want to see the Excel file:
if(MessageBox.Show("Excel report has been created on your desktop\nWould you like to open it?", "Created Excel report", MessageBoxButtons.YesNo, MessageBoxIcon.Information, MessageBoxDefaultButton.Button2) == DialogResult.Yes){ Process.Start(fileName);}
Synchronizing the Spreadsheet with SQL Server tables
As we are directly manipulating the Excel data in the worksheet as if it was a table we can do .
What about synchronising the table after editing the Excel spreadsheet?
To try this out, you’ll need to , and a few rows from the Excel spreadsheet, remembering to close it after you’ve done it.
Firstly, we’ll delete any rows from that do not exist in the Excel spreadsheet.
|
1 |
DELETEFROM##CambridgePubs FROM##CambridgePubsc LEFTOUTERJOINCambridgePubDatabase…CambridgePubsex ONc.addressLIKEex.address ANDc.pubnameLIKEex.pubname ANDc.postcodeLIKEex.postcode WHEREex.pubnameISNULL |
Then we insert into any rows in the spreadsheet that don’t exist in .
|
1 |
INSERTINTO##CambridgePubs (Pubname,Address,Postcode) SELECTex.Pubname,ex.Address,ex.Postcode FROMCambridgePubDatabase…CambridgePubsex LEFTOUTERJOIN##CambridgePubsc ONc.addressLIKEex.address ANDc.pubnameLIKEex.pubname ANDc.postcodeLIKEex.postcode WHEREc.pubnameISNULL |
All done (reverse syncronisation would be similar).
Переходим к делу
Для примера возьмем задачу по автоматизации отчета по эффективности контекстной рекламы.
К данному отчету заказчиком предъявляются следующие требования:
- Отчет должен содержать исторические данные по вчерашний день;
- Отчет должен обновляться ежедневно в автоматизированном режиме;
- Помимо Power BI, должна быть возможность подключения к отчету через Excel.
Также отчет должен содержать следующие параметры и показатели:
- Дата;
- Источник/Канал
- Кампания
- Сумма расходов;
- Кол-во показов;
- Кол-во кликов;
- Кол-во сеансов;
- Кол-во заказов;
- Доход;
- Рассчитываемые показатели — CPC, CR и ROMI.
Естественно, все данные должны быть предварительно загружены в хранилище, но это тема отдельного поста и обычно этим занимаются data-инженеры. Мы же с вами аналитики и используем те данные, которые для нас любезно сложили в DWH (хранилище данных).

В моем случае DWH работает на базе MS SQL Server и содержит следующие таблицы:
- sessions — данные из Google Analytics загруженные посредством коннектора к Reporting API v4;
- costs — данные по расходам, предварительно загруженные в Google Analytics;
- orders — данные по заказам и доходу из внутренней CRM-системы.
Для работы нам потребуется установить:
- SQL Server Management Studio — для подключения к DWH;
- Power BI Desktop — для создания отчета.
Опущу совсем уж базовые вещи, такие как регистрация аккаунтов и установка программ, с этим вы без проблем справитесь и сами.
С чего начать изучать SQL
Для старта стоит изучить основы проектирования баз данных. Возвращаясь к частям языка SQL, первое — создание и изменение таблиц. Это значит, что нам нужно разложить свою задачу на составляющие. На этом этапе мы разбираемся, как будем хранить информацию. Это и называется проектированием баз данных: какие таблицы нужны, из каких столбцов они будут состоять и как будут связаны друг с другом.
Второй пункт — практическая работа с данными: запросы, которые выбирают определенные данные, удаляют их, изменяют и так далее. Как говорят из своего опыта специалисты, начавшие путь с самостоятельного изучения SQL, стартовать нужно сразу с практических задач онлайн — учиться правильно ставить команды. Можно попробовать с сайтов sql-ex.ru, pgexercises.com и sql-tutorial.ru.
Только после этого можно приступать к книгам. Например, «Освой самостоятельно SQL за 10 минут» Бена Форта, «Введение в системы баз данных» Криса Дейта или «SQL. Полное руководство» Джеймса Гроффа и Пола Вайнберга.
Но главный минус книг — информация в них обновляется медленнее, чем развиваются технологии баз данных. Поэтому самый простой и эффективный способ разобраться и изучить SQL — пройти специализированный курс от проверенных специалистов. На нем можно не только познакомиться с базовыми операциями, но и изучить тонкости манипуляций.
Профессия
«Аналитик данных»
- Изучите востребованную в каждой компании профессию и помогайте бизнесам расти и развиваться
- Научитесь собирать, обрабатывать, изучать и интерпретировать данные с помощью SQL и Google Sheets
- Освойте когортный анализ и визуализацию данных с помощью Superset и библиотек Python
Попробовать бесплатно
Add a Module
From the Project Explorer, right click the project and insert a module.

The Module has a procedure to connect to the database using ADO classes and properties. It also has few Public variables.
Option Explicit

Public myConn As New ADODB.Connection
Public rs As New ADODB.Recordset
Public sQuery As String


Sub setConn()
    If myConn.State = adStateOpen Then
        myConn.Close
    End If


    Dim sConnString As String
    sConnString = "Driver={SQL Server};Server=arun;Database=your_database_name;Uid=sa;pwd=any_password;Connect Timeout=500;"

    myConn.ConnectionString = sConnString
    myConn.Open
End Sub
See the connection string, where I have defined the Driver and other SQL Server properties like the user name and password.
Выполнение SQL-запросов в Excel
Power Query позволяет подключаться к различным источникам данных, включая базы данных, и выполнять SQL-запросы прямо в Excel. Чтобы начать использовать Power Query, вам необходимо установить дополнение Power Query для Excel.
После установки Power Query вы можете начать выполнять SQL-запросы. Для этого следуйте этим шагам:
- На вкладке «Данные» выберите «Получить данные».
- Выберите источник данных, с которым вы хотите работать (например, базу данных).
- Введите параметры подключения к базе данных, такие как адрес сервера, имя пользователя и пароль.
- Выберите таблицы или представления, из которых вы хотите извлечь данные.
- Введите SQL-запрос, который вы хотите выполнить. Вы можете использовать стандартный SQL-синтаксис для написания запросов.
- Нажмите кнопку «Выполнить», чтобы выполнить SQL-запрос и получить результаты в Excel.
Результаты выполнения SQL-запроса будут отображены в форме таблицы в рабочем листе Excel. Вы можете дальше обрабатывать и анализировать эти данные, применяя фильтры, сортировку, формулы и т. д.
Кроме того, Power Query позволяет настроить обновление данных, чтобы получать свежие данные из базы данных автоматически. Вы можете задать расписание обновления данных или обновлять их вручную при необходимости.
Выполнение SQL-запросов в Excel с помощью Power Query дает вам большую гибкость и контроль над данными. Вы можете извлекать нужные вам данные из базы данных, выполнять сложные операции и анализировать результаты, все внутри Excel. Это значительно упрощает и ускоряет работу с данными и делает вас более продуктивным.
Таким образом, выполнять SQL-запросы в Excel с помощью Power Query — это мощный инструмент, который может быть очень полезен для работы с данными из базы данных. Используйте его, чтобы извлекать, анализировать и визуализировать данные в Excel, и повысьте свою продуктивность в работе с данными.
Приведенная ниже таблица демонстрирует пример выполнения SQL-запроса в Excel с помощью Power Query:
| id | name | age |
|---|---|---|
| 1 | Иван | 25 |
| 2 | Мария | 30 |
| 3 | Алексей | 35 |
Managing Data through Excel Add-ins
When it comes to working with SQL in Excel, one highly effective method is using Excel add-ins to manage and manipulate data. These add-ins enhance Excel’s native capabilities and simplify complex tasks, such as importing data from databases, running SQL queries, and editing data in real-time. In this section, we’ll explore various Excel add-ins that can help users perform SQL operations right within Excel.
Microsoft Power Query is one such popular add-in that enables users to import and transform data from various sources, including SQL databases. With this add-in, users can seamlessly connect to data sources, import data, and even run SQL queries to retrieve specific information. Key features of Power Query include:
- Data import from a wide range of sources, including SQL databases
- Comprehensive data transformation tools
- An intuitive query editor for SQL
Another handy add-in for SQL in Excel is SQL Spreads. This user-friendly tool allows you to link Excel directly to your SQL Server, offering real-time data editing and updating. SQL Spreads comes with several advantages:
- Simplifies data management with a direct connection to databases
- Instantly updates data changes to the SQL Server
- Robust data filtering and sorting capabilities
For advanced users and developers, QueryStorm is an excellent choice.
Related articles
- How to Create a Temp Table in SQL: A Quick Guide
- How to Learn SQL JOIN Types Explained with Visualization
- How to Use AVG in SQL
- How to Use Dates in SQL
- How to CREATE VIEW in SQL
- How to Use AUTO INCREMENT in SQL
- How to Use the SQL Default Constraints
- How to Use the SQL Check Constraint
- How to Use DENSE_RANK() in SQL
- How to Use PRIMARY KEY in SQL
- How to Use Unique Alter Table in SQL
- How to Use ROW_NUMBER & OVER() in SQL
- How to Use Unique Constraint in SQL
- How to Concatenate Two Columns in SQL?
- How to Include Zero in a COUNT() Aggregate
- What Are DDL, DML, DQL, and DCL in SQL?
- What is an SQL Inline Query?
- What Is the Benefit of Foreign Keys in SQL?
- How to Use Constraints Operator in SQL
- What a Moving Average Is and How to Use it in SQL
- How to Analyze a Time Series in SQL
- How to Use TRUNCATE TABLE in SQL
- TRUNCATE TABLE vs. DELETE vs. DROP TABLE
- How to Number Rows in SQL
- How to Use 2 CTEs in a Single SQL Query
- How to Use Lag and Lead Functions in SQL
- How to Calculate the Length of a Series with SQL
- How to Use Aliases in SQL Queries for Clearer Code
- How to Use the BETWEEN Operator in SQL
- How to Use the IN Operator in SQL
- What are & How to Use Wildcards in SQL
- How to Use TOP in SQL with Examples
- How to Use WHERE in SQL with Examples
- How to Use AND OR Operators Correctly in SQL
- How to Use HAVING Clause in SQL
- How to Use the Alter Command in SQL: Renaming Tables and Columns
- How to Use INSTR in SQL? Find Substrings Easily with Examples
- How to Use the PARTITION BY Clause in SQL with Examples
- How to Use ROUND Function in SQL Explained with Examples
- How to Use CAST Function in SQL?
- Why Use WHERE 1=1 in SQL Queries? Exploring Its Impact on Database Efficiency
- How to Create a Table in SQL? Your Step-by-Step Guide for Beginners
- How to Use GROUP BY in SQL? Master the Art of Query Optimization
- How to Use UPDATE in SQL: A Comprehensive Guide for Beginners
- How to Use Select in SQL: A Beginner’s Guide to Database Queries
- How to Use Select Distinct in SQL: A Simple Guide for Efficient Database Queries
- How to Use Union in SQL: A Simple Guide for Efficient Database Management
- How to Use Self Join in SQL: A Comprehensive Guide for Beginners
- How to Use Full Join in SQL: A Comprehensive Guide for Beginners
- How to Use Right Join in SQL: A Comprehensive Guide for Database Enthusiasts
Добавление ячеек
В программе Excel вы можете работать с таблицами, состоящими из ячеек. Каждая ячейка представляет собой прямоугольный блок, в который можно вводить и хранить данные.
Чтобы сделать ячейку в Excel:
- Включите программу Excel и откройте новую или существующую таблицу.
- Выберите саму ячейку, в которой планируете создать новую ячейку. Вы можете выбрать ячейку, кликнув на нее один раз.
- Щелкните непосредственно правой кнопкой мыши на выбранной ячейке. Появится контекстное меню.
- В открытом контекстном меню выбирайте опцию «Вставить«. Появится дополнительное меню с вариантами вставки.
- Выберите нужный вариант вставки ячейки из представленного перечня. Например, можно выбрать «Вставить ячейки» либо «Вставить ячейки сдвигая существующие«.
- После выбора варианта вставки появится диалоговое окно. Введите данные или значение, которые вы желаете поместить в ячейку.
- Нажмите один раз клавишу «Enter» или щелкните мышью за пределами ячейки, чтобы завершить процесс создания ячейки.
Добавление ячеек в Excel
Способ 1: Контекстное меню
Последовательность действий следующая:
- Откройте программу Excel и начните создание новой таблицы либо откройте уже существующую.
- Наведите курсор мыши на ячейку, рядом с которой вы желаете вставить новую.
- Нажмите правой кнопкой на выбранной ячейке и появится контекстное меню.
- В контекстном меню выбирайте «Вставить» либо «Вставить ячейку«.
- Появится диалоговое окно с настройками вставки ячейки. Здесь можно выбрать, какая именно ячейка должна быть вставлена (выше, ниже, слева или справа от текущей ячейки).
- Выберите необходимые опции и нажмите «ОК«. Ячейка будет создана в указанном месте.
Добавление ячейки с помощью контекстного меню
Способ 2: Кнопка на ленте
Последовательность действий следующая:
- Откройте программу Excel и создайте новую таблицу или откройте уже существующую.
- Найдите вкладку «Вставка» на ленте инструментов в верхней части экрана.
- На вкладке «Вставка» найдите группу «Ячейки» и нажмите на кнопку «Вставить ячейки«.
- Появится диалоговое окно с настройками вставки ячейки. Здесь вы можете выбрать, какая именно ячейка должна быть вставлена (выше, ниже, слева или справа от текущей ячейки).
- Выберите необходимые опции и нажмите «ОК«. Ячейка будет создана в указанном месте.
Создание ячейки с помощью кнопки на ленте
Способ 3: Горячие клавиши
Последовательность действий следующая:
- Открывайте Excel и создавайте новую таблицу либо откройте уже существующую.
- Наведите курсор мыши на ячейку, рядом с которой вы желаете вставить новую.
- Нажмите «Shift» и удерживайте ее нажатой.
- При удерживании «Shift» нажимайте «+» на клавиатуре.
- Вставится новая пустая ячейка ниже текущей.
Создание ячейки с помощью горячих клавишей