
What is .DMP file?
Windows Memory Dump files with the .dmp extension are system files stored in a binary format. These files are automatically created if there’s an error or sudden crash of the third-party program or system feature.
They store the details about the crash, so most seasoned users will utilize .dmp files to troubleshoot the affected programs.
If there’s a BSOD (Blue Screen of Death), the details about the possible causes (drivers or other software are usual suspects) must be found in the automatically-generated .dmp file.
For obvious reasons, they are mostly named Memory.dmp or Crash.dmp, respectively. Size-wise, they might be small individually.
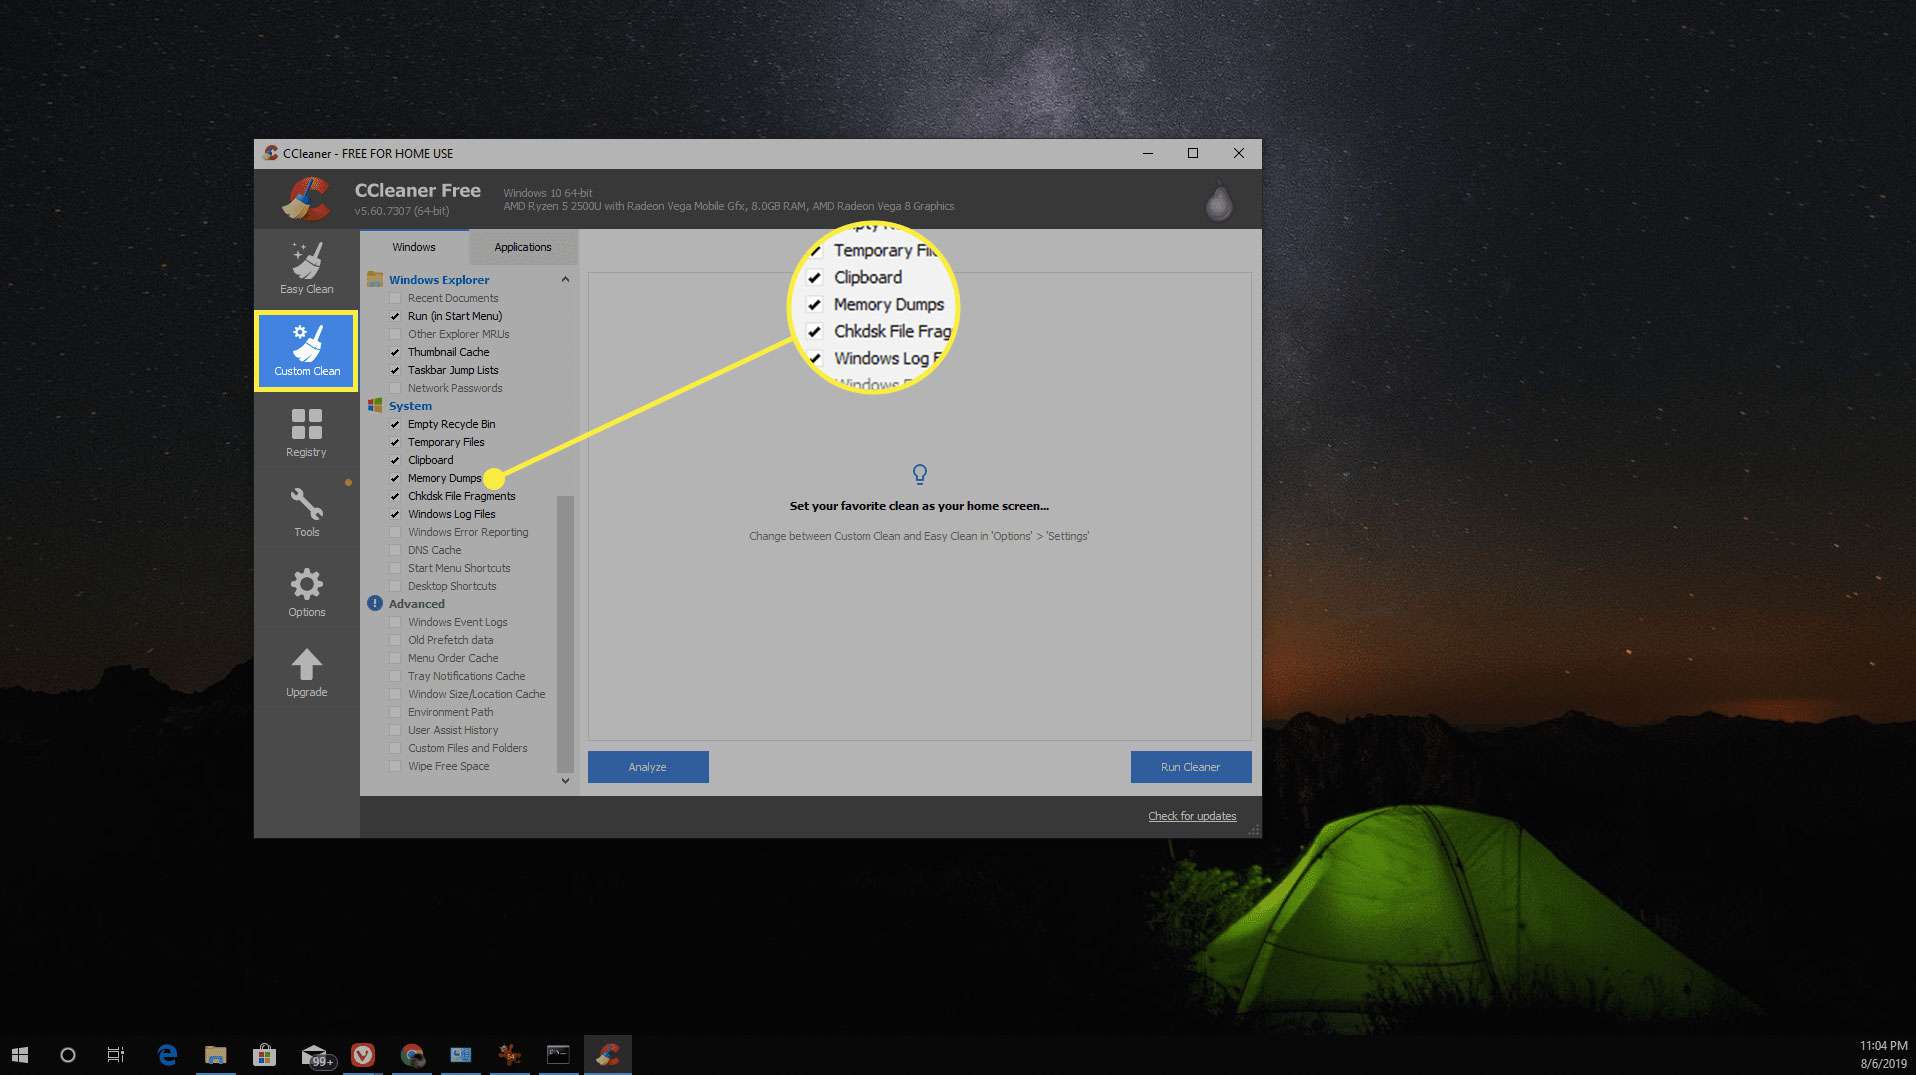
However, as they tend to pile up over time, DMP files can take up a lot of storage space when bundled. So, you can clean them up with ease with the Disk Cleanup utility.
Now, opening DMP files isn’t exactly simple since Windows 10 doesn’t offer a built-in tool. There’s a good reason for this, as most common users will not need or want to access them in the first place.
However, a few third-party utility tools should enable you to open and read DMP files.
Первичный анализ файла дампа памяти MEMORY.DMP при STOP-ошибках Windows (BSOD)
В указанную на первом экране папку из Интернета будет загружен и установлен набор утилит.
После окончания установки находим в меню “Пуск” или на стартовом экране в группе ярлыков Windows Kits утилиту WinDbg и запускаем её с правами администратора
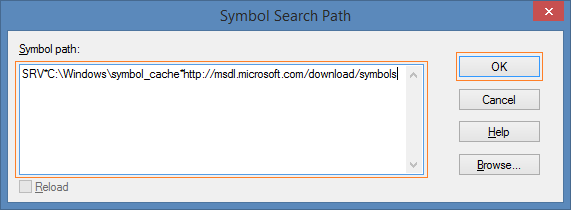
В главном меню программы WinDbg выбираем пункты File > Symbol File Path. В открывшееся окно вставляем строку определяющую пусть к локальному каталогу символьного кэша и его онлайн-источнику:
Сохраняем настройки, выбрав в главном меню пункты File > Save Workspace
Открываем файл дампа памяти, выбрав в меню File > Open Crash Dump.
Выбираем файл MEMORY.DMP (по умолчанию расположен в каталоге C:Windows ) и нажимаем Open
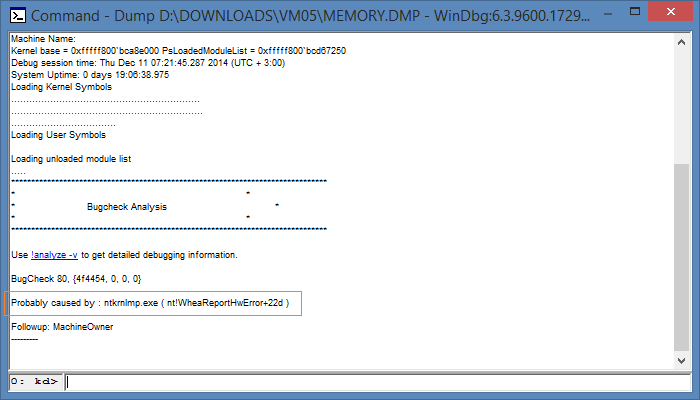
Появится информация о том, какой именно исполняемый модуль стал причиной остановки работы системы. Щёлкнув по гиперссылке !analyze-v можно получить более развернутую информацию о состоянии системы на момент возникновения стоп-ошибки.
Туже самую информацию можно получить и с помощью командной строки используя примерно следующую последовательность команд:
Источник
Для чего он нужен
Данные «оперативки» и материалы, имеющие отношение к критической ошибке, попадают в файл. При запуске ОС появляется аварийный дамп, где сохраняется запись отладочной информации. Сбой блокирует функционирование ОС, поэтому dump – единственный способ получения данных о ней. Чем точнее в нем будет описана проблема, тем проще пользователю проанализировать ситуацию и найти способы решения по устранению недочетов в работе ОС.
Важно получить информацию на момент сбоя. Создание дампа памяти помогает в этом
Аварийный dump применяется с целью диагностики, позволяет выявить и устранить возникшую ошибку программы.
Как работает опция? Во время запуска ОС создает и сохраняет карту секторов, которые занимает на диске файл подкачки. При сбое в работе проверяется целостность этой карты, а также компонентов структуры. Если они не нарушены, то применяются опции, которые сохраняют образ памяти, записывая данные с использованием сохраненной секторной карты.
При следующем запуске ОС диспетчер инициализирует данные, проверяет наличие в нем файлов .dmp. Далее содержимое копируется из него в файл аварийного дампа, делаются соответствующие записи.
Do I Need a Special Program to View DMP Files or Open Them?
Windows minidump files aren’t the same as typical files, and as such do need a special program to open and view them. The most accessible and notable program available is the Windows 10 Debugger Tool (WinDbg), which is easily obtainable from the Microsoft website.
Another option is to use a program called BlueScreenView, which works very similarly to the WinDbg program. Simply download the zip file from the link above and extract the program to start. When you load BlueScreenView up, you will need to use it to open a Windows minidump file, which will allow you to view a summary of the problem and the cause behind it.
Finally, the program WhoCrashed attempts to do the same thing as BlueScreenView, but with a more user-friendly interface and a slightly more in depth analysis than a summary. It will offer more details on what the minidump file contains, as well as offer its own suggestions on what to do about the problem.
Note: it is highly recommended that you run any third-party program that you download through a virus checker before using.
How can I use DMP file viewer?#
2. Use WhoCrashed
This tool requires installation, but it’s fairly usable and has all the features you’ll need. You can even simulate the system crash (do this with caution) with certain parameters.
3. Use NirSoft DMP file viewer
The app is a portable small-sized application, so it doesn’t require installation. Once you get it, just extract it and run the EXE file. However, we’re rushing. Firstly, you must let the system create the dump files readable by the third-party software.3. Use WinDbg.
The latest Windows packages are equipped with debugging tools that often include a DMP file viewer. The most popular ones are WinDbg.exe (the Windows Debugger), KD.exe, CDB, and NTSD. They are also part of the WDK (Windows Driver Kit). The one we recommend to open DMP files is WinDbg.
SPONSORED
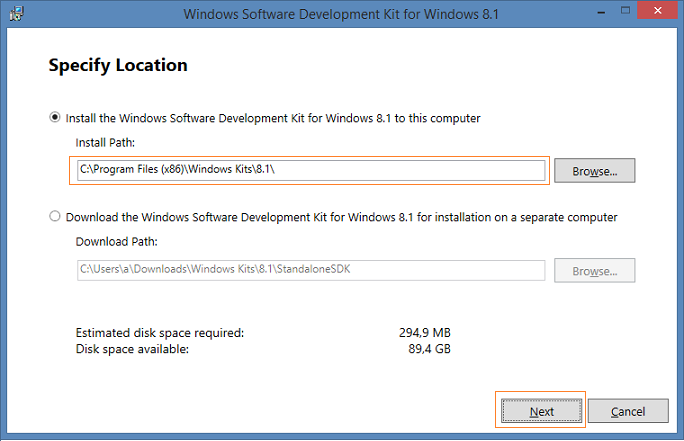
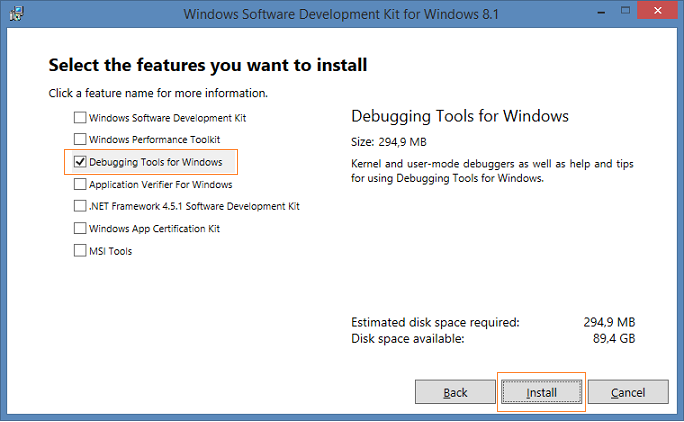
1. Download and install WDK from the Microsoft official page (When doing so, you can also choose to install only Debugging Tools for Windows as a standalone package).
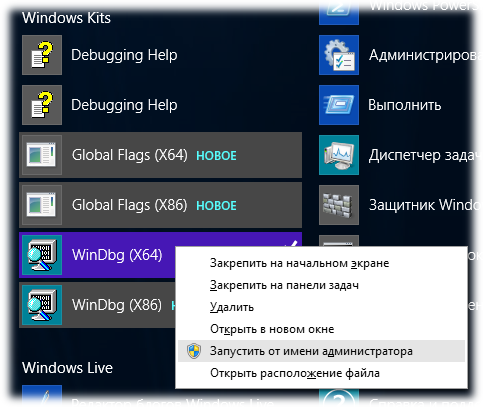
2. Press the Windows key to open the search bar.
3. Type WinDbg in the search bar and open it with admin rights.
4. Next, navigate to the File menu.
5. Click on Start debugging.
6. Moreover, select Open Dump file.
7. Browse your PC for the DMP file you want to open.
8. Click on Open after you select it.
9. The DMP file will now be opened and you can read it.
After analyses of dump files, you often have to fix the corrupted memory dump. Deleting these files will have no negative effect on your computer. They are mainly used for debugging purposes.
You might want to keep them in case of errors or bugs. They will provide information about who is responsible for a crash or an error message.
That should do it. If you have alternative ways to open and read DMP files, tell us in the comment section below. We’ll be glad to hear from you.
Δ
How can I use DMP file viewer?
1. Use a DMP file viewer online
- Visit the DMP online site. In this case, we will use File Pro.
- Click on Select the dump file.
- Wait for the dump file analyzer to complete the upload, and you can view the dump files.
2. Use WhoCrashed
- Visit the Who Crashed website.
- Scroll down and click Download Free Home Edition in the Who Crashed section.
- Click on the downloaded file to install it.
- Click Next and follow the wizard to complete the installation.
- After installation, click on Analyze.
This tool requires installation, but it’s fairly usable and has all the features you’ll need. You can even simulate the system crash (do this with caution) with certain parameters.
3. Use NirSoft DMP file viewer
- Visit the NirSoft website.
- Scroll down and click on Download BlueScreenView.
- Extract the Zip file.
- Double-click on BlueScreenView to start the application.
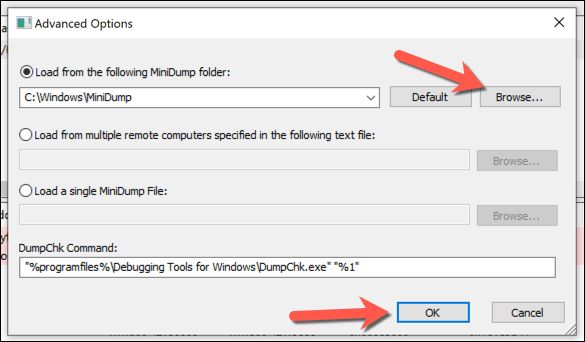
- Click on the Analyze icon, select Load from the following MiniDump folder, select Browse and choose your dump file, then click OK.
The app is a portable small-sized application, so it doesn’t require installation. Once you get it, just extract it and run the EXE file. However, we’re rushing. Firstly, you must let the system create the dump files readable by the third-party software.3. Use WinDbg.
Some PC issues are hard to tackle, especially when it comes to corrupted repositories or missing Windows files. If you are having troubles fixing an error, your system may be partially broken. We recommend installing Restoro, a tool that will scan your machine and identify what the fault is.Click here to download and start repairing.

The latest Windows packages are equipped with debugging tools that often include a DMP file viewer. The most popular ones are WinDbg.exe (the Windows Debugger), KD.exe, CDB, and NTSD. They are also part of the WDK (Windows Driver Kit). The one we recommend to open DMP files is WinDbg.
1. Download andinstall WDK from the Microsoft official page(When doing so, you can also choose to install only Debugging Tools for Windows as a standalone package).
2. Press the Windows key to open the search bar.
3. Type WinDbg in the search bar and open it with admin rights.
4. Next, navigate to the File menu.
5. Click onStart debugging.
6. Moreover, selectOpen Dump file.
7. Browse your PC for the DMP file you want to open.
8. Click on Open after you select it.
9. The DMP file will now be opened and you can read it.
After analyses of dump files, you often have to fix the corrupted memory dump. Deleting these files will have no negative effect on your computer. They are mainly used for debugging purposes.
You might want to keep them in case of errors or bugs. They will provide information about who is responsible for a crash or an error message.
That should do it. If you have alternative ways to open and read DMP files, tell us in the comment section below. We’ll be glad to hear from you.
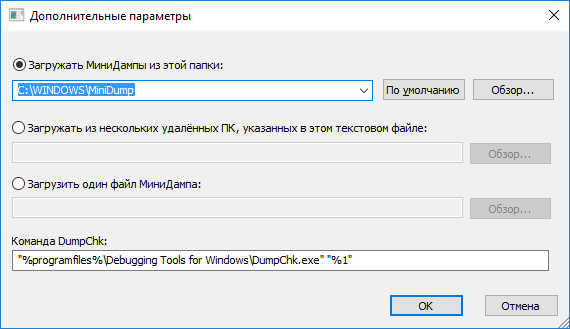
Как открыть файл дампа с помощью WinDbg
В Windows 10 вы можете найти несколько способов открыть и просмотреть файл с ошибкой дампа, но самый простой способ — использовать инструмент WinDbg, доступный в Microsoft Store.
Установка WinDbg
Чтобы установить инструмент WinDbg в Windows 10, выполните следующие действия:
После того, как вы выполните эти шаги, приложение будет установлено, и оно будет доступно в меню «Пуск».
Анализ файла DMP
Чтобы открыть и проанализировать файл дампа, созданный в результате сбоя в Windows 10, выполните следующие действия:
Шаг 1: Откройте Пуск.
Шаг 2: Нажмите на иконку поиска, введите WinDbg и нажав правым кликом по WinDbg выберите параметр «Запуск от имени администратора».
Шаг 3: В меню программы откройте пункт «Файл».
Шаг 4: Нажмите «Начать отладку».
Шаг 5: Выберите «Открыть дамп файл».
Шаг 6: Выберите файл дампа в папке, например:
%SystemRoot%Minidump
Шаг 7: Нажмите кнопку «Открыть».
Шаг 8: Дождитесь окончания (это может занять некоторое время).
Шаг 9: Введите следующую команду в команде запуска и нажмите Enter:
Шаг 10: Проверяйте индикатор выполнения, пока анализ не будет завершен (это может занять много времени в зависимости от размера данных).
После того, как вы выполните эти шаги, приложение вернет анализ файла дампа, который вы затем сможете просмотреть, чтобы определить причину проблемы, чтобы помочь вам решить проблему.
Информация будет разной в зависимости от проблемы. Например, этот тестовый файл дампа показывает информацию о синем экране смерти (BSoD), также известном как проверка ошибок.
Результат указывает на то, что это был сбой, инициированный вручную с кодом ошибки «e2», что является правильным, поскольку в целях данного руководства мы используем эти инструкции для принудительного выполнения BSoD. WinDbg даже отлично описывает сбой на языке, понятном любому (пользователь вручную инициировал этот аварийный дамп).
Продолжая просматривать файл дампа, вы также найдете дополнительную информацию, такую как «FAILURE_BUCKET_ID» и «MODULE_NAME», которые могут указывать на причину проблемы.
Информация может быть огромной, поскольку она не предназначена для обычных пользователей.
How to use WinDbg Preview to open a DMP file
WinDbg Preview is a powerful Microsoft development tool that can be used to open, analyze, and troubleshoot DMP files in Windows 11. To get started, you’ll need to download and install WinDbg Preview from the Microsoft Store. Once installed, open the tool and follow these steps:
- Select “Open dump file” from the File menu.
- Locate the DMP file you want to open and select it.
- Wait for the tool to load the file, which may take a few moments depending on its size.
- Once the file is loaded, you can start analyzing it by using the command “!analyze -v” in the command window.
This will initiate the analysis process and provide you with detailed information about the error that caused the crash. WinDbg Preview offers a variety of commands and features that can help you further investigate the issue and find a resolution.
Example table:
| Error Code | Error Description | Possible Solution |
|---|---|---|
| 0x0000001E | Driver-related error | Update or reinstall the driver |
| 0x0000003B | System service exception | Scan for malware or check RAM |
| 0x0000007E | System thread exception | Check for software conflicts or update BIOS |
Using WinDbg Preview, you can gain valuable insights into the DMP file and identify the root cause of the crash. This can be particularly helpful for developers and IT professionals who need to troubleshoot system errors and ensure the stability and reliability of their Windows 11 environment.
How to Read and Analyze DMP Files
As we mentioned, Windows does not allow you to open dump files directly. However, you can use other tools available online to open and analyze them. One of the most common tools to do so is through the Windows Debugging (WinDbg) tool, which can be downloaded through Microsoft Store. Continue reading the given guide below to use this tool to open and analyze memory dump files in Windows.
Using WinDbg
We have divided this section into 2 parts: Downloading and installing the WinDbg tool and then using it to analyze a dump file.
Download and Install WinDbg
- Open the WinDbg Preview page in the Microsoft Store and click Get.
- The browser will prompted you to open the Microsoft Store app, click Open Microsoft Store.
- From the Store app, click Get again.
The WinDbg tool will now begin to download and then install. We are now done with the installation phase. Let us now use the tool to open and analyze dump files.
Open and Analyze dmp files using WinDbg
- Open the WinDbg tool with administrative rights by searching for it through the search box, right-clicking it, and then clicking Run as administrator from the context menu.
- From the WinDbg tool, click File from the top menu.
- In the Start Debugging tab, click Open dump file.
- Now click Browse from the right pane within the tool and select the dump file that you want to analyze by navigating to . When selected, click Open.
- The tool will now open the dump file, which can take a few minutes. When the dump file successfully opens, type in the following command in the text field in front of “0: kd>“:
- WinDbg will now begin analyzing the dump file. This can take a few minutes to complete. Once completed, you should see the results in the top window.
In the example above, since we initiated a BSoD intentionally, it states “The user manually initiated this crash dump.” Otherwise, if it were an actual error, you would see different statements and information after performing the analysis of the dump file.
You can then use this information to troubleshoot the error that caused the crash.
Using WhoCrashed
Download WhoCrashedWhoCrashed
WhoCrashed is available in both free and paid editions. However, the free edition is sufficient to open and analyze dump files. With this tool, you can obtain reports on the dump files with a single click. The tool will automatically scan your system files for any .dmp files and fetch the data within.
![Как открыть файлы dmp в windows 10 [easy steps]](https://lakfol76.ru/wp-content/uploads/7/7/0/7706d5e3207b3e966507cff8f9eb46c7.jpeg)
To do so, download WhoCrashed from the link given above, and run the .exe file to install in a few easy steps. Once installed, click Analyze from the ribbon menu at the top. The tool will then take a few seconds to scan any dump files and present the analysis. You can also view the .dmp files discovered from the Dump files tab.
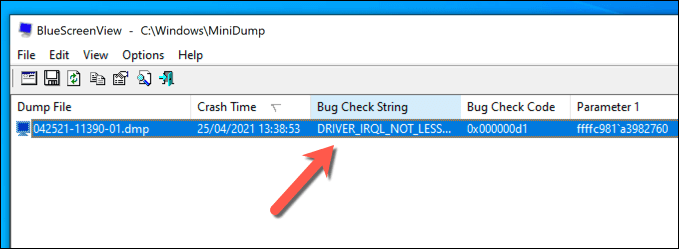
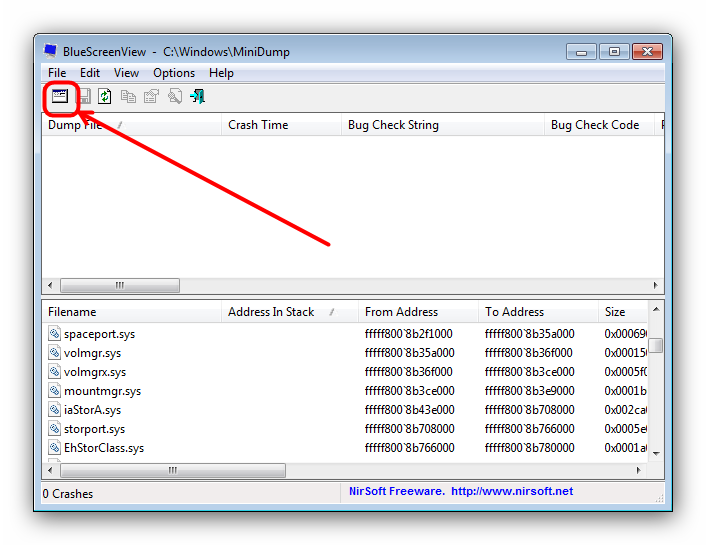
Using BlueScreenView
BlueScreenView
BlueScreenView is a portable and small tool that can provide you with relevant information on minidump files. When you run this tool, it automatically picks up any .dmp files in the Minidump directory and displays the relevant information gathered from them. If there are multiple .dmp files, you can click on the one you want to analyze from the top field within the tool, and the information is presented in the bottom one.
Simply download the app from the link given above, extract the content and run the BlueScreenView application.
Что такое файл DMP?
Файл «.dmp» содержит сообщение об ошибке, список драйверов, загруженных во время сбоя, а также сведения о ядре, процессоре и процессах.
Windows 10 создает файлы дампа автоматически, но в самой ОС нет никаких встроенных инструментов, которые смогли бы откырть файл дампа. Чтобы открыть dmp-файл мы воспользуемся программой Microsoft WinDbg.
WinDbg (отладка Windows) — это инструмент, который был разработан для отладки кода в режиме ядра и в режиме пользователя, проверки реестров процессора и анализа аварийных дампов.
В этом руководстве по Windows 10 мы покажем вам, как открыть файл дампа, чтобы попытаться выяснить, что вызвало сбой, чтобы решить проблему на вашем компьютере.
What are Minidump Files Useful For?
Windows minidump files were designed to be used for the purpose of diagnosing and troubleshooting the cause of a system crash. The information gathered within a minidump file is all related to what Windows was experiencing at the time of the crash, so, you can read and analyze dmp files to reveal what stopped working and often find out why the system crashed.
While full sized crash dump files exist, they contain far more information than minidump files, making it harder to pinpoint an issue. This makes Windows minidump files far better suited to a speedy diagnosis and solution. Because of this, they are especially useful when troubleshooting a Blue Screen of Death (BSoD) issue. If you’d like to see our explanation of how to fix a generic BSoD error, you can find it here.
Расширение файла .dmp часто дается неправильно!
По данным Поиск на нашем сайте эти опечатки были наиболее распространенными в прошлом году:
cmp,
dhp,
djp,
dkp,
dlp,
dm,
dml,
dmo,
dnp,
dp,
dpm,
emp,
fmp,
mdp,
mp
Это возможно, что расширение имени файла указано неправильно?
Мы нашли следующие аналогичные расширений файлов в нашей базе данных:
.dkp
Dreamkeys Plug-in
.dlp
Microsoft DirectMusic Producer Audio
.emp
eMusic Playlist
.rmp
Real Metadata Package
.dhp
Dr. Halo Picture
Не удается открыть файл .dmp?
Если дважды щелкнуть файл, чтобы открыть его, Windows проверяет расширение имени файла. Если Windows распознает расширение имени файла, файл открывается в программе, которая связана с этим расширением имени файла. Когда Windows не распознает расширение имени файла, появляется следующее сообщение:
Выберите приложение для открытия этого файла .dmp
Это означает, что в операционной системе нет приложения по умолчанию, связанного с типом файла .dmp. Чтобы решить эту проблему и открыть файл, вы можете выполнить следующие действия:
- Щелкните правой кнопкой мыши на файле .dmp. Появится контекстное меню.
- В контекстном меню выберите Открыть с помощью. Windows отобразит список рекомендуемых приложений.
- Если нужное приложение есть в списке, выберите его из предложенных вариантов.
- Если вы не можете найти соответствующее приложение, возможно, вам потребуется установить программное обеспечение, поддерживающее конкретный тип файла.
Если вы не знаете, как изменить приложение по умолчанию для файла .dmp, ознакомьтесь с FAQ.
Можно ли изменить расширение файлов?
Изменение расширения имени файла — не самая лучшая идея. Расширение файла служит подсказкой для операционной системы и различных программ о типе данных, содержащихся в файле. Изменяя расширение файла, вы, по сути, изменяете то, как программы интерпретируют и обрабатывают этот файл. Каждый файл имеет определенный формат, также известный как тип файла или формат файла. Проблема в том, что изменение расширения файла не меняет его формат.
Если у вас есть полезная информация о расширение файла .dmp, напишите нам!
Wrapping it Up
When it comes to diagnosing software based computer crashes, Windows minidump (.dmp) files are an invaluable asset in any computer owner’s toolbelt. By using these files, you can quickly, and easily, determine what program, application or driver is causing your computer to crash, as well as acquire some steps you can take to try and fix the problem straight away. Although they don’t contain as much information as full Crash Dump Files, and won’t reveal if any additional errors occurred, the info they do contain is invaluable for obtaining a quick diagnosis and developing a recovery method.
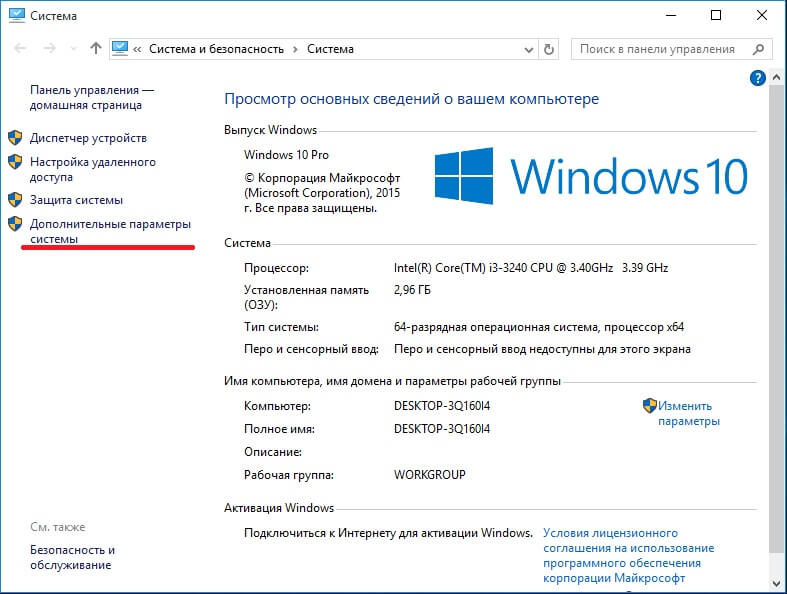
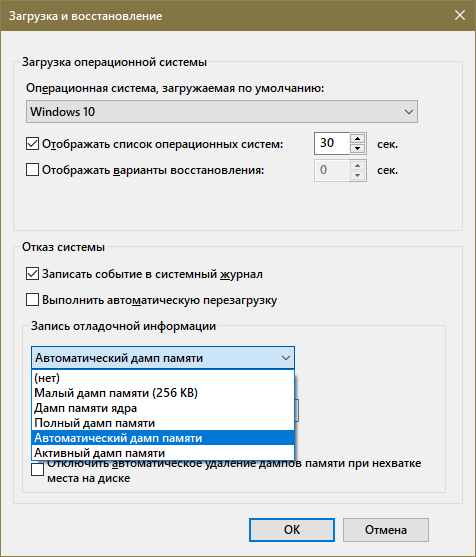
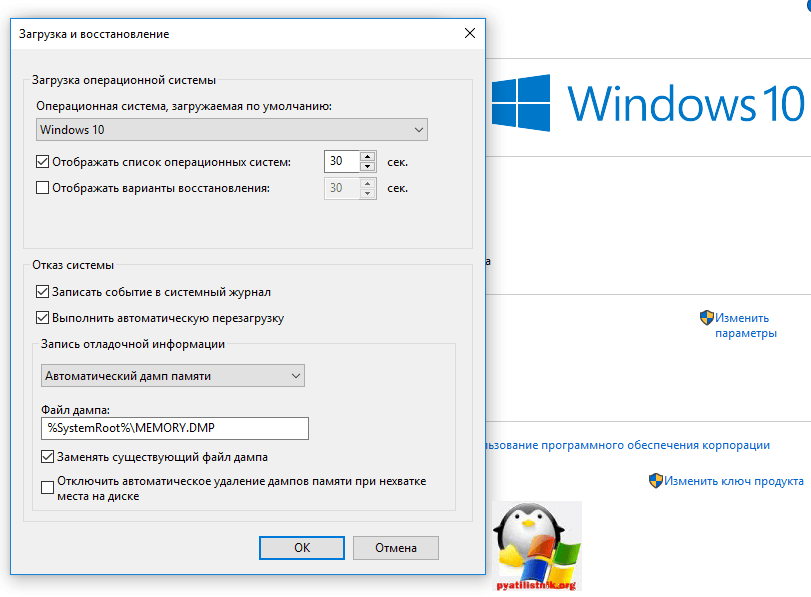
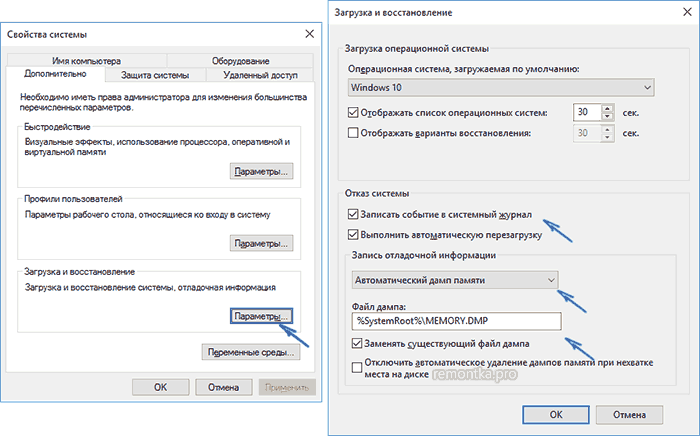
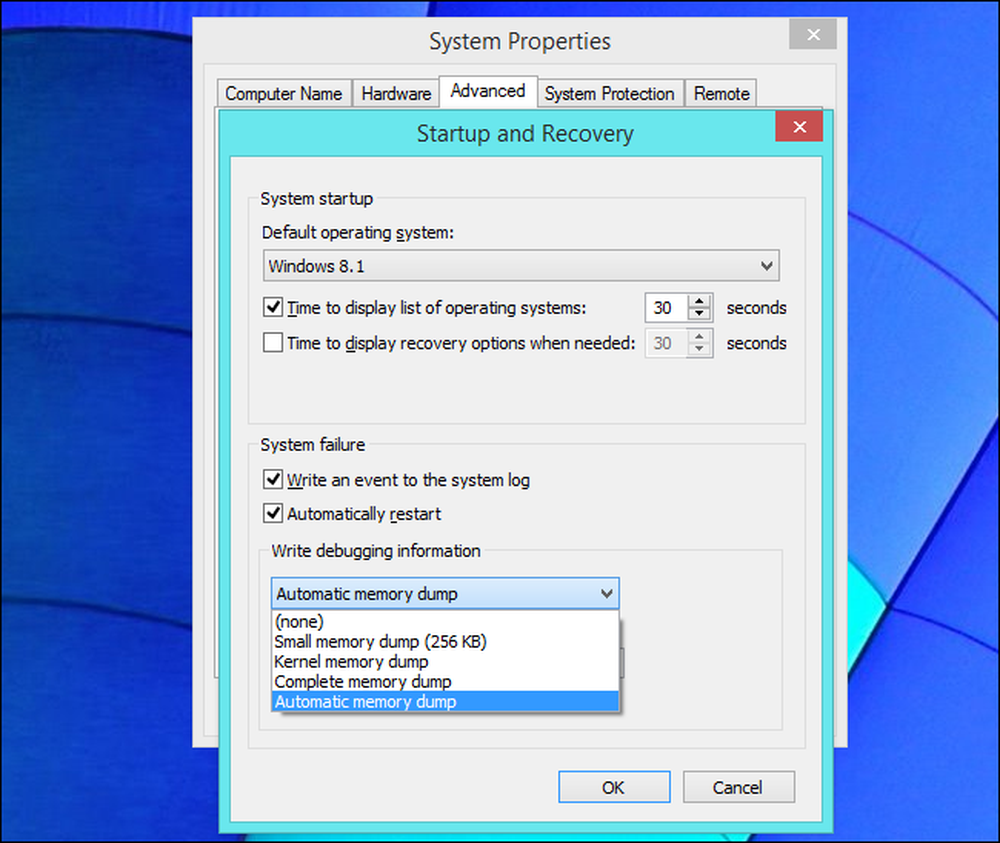
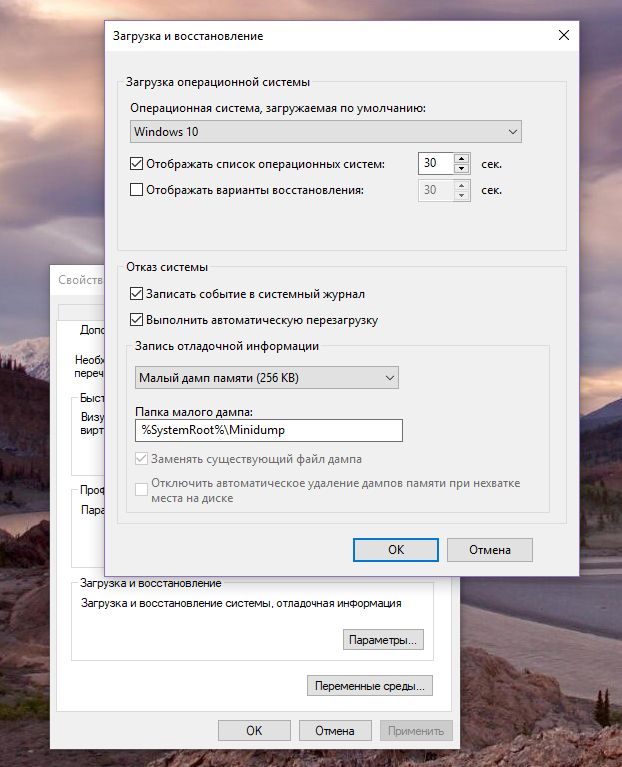
Как включить функцию дамп памяти на Windows 10 и настроить ее
Чтобы включить опцию, пользователю потребуется выполнить ряд последовательных действий. В инструкции нет ничего сложного, с ней справится даже новичок в этом деле:
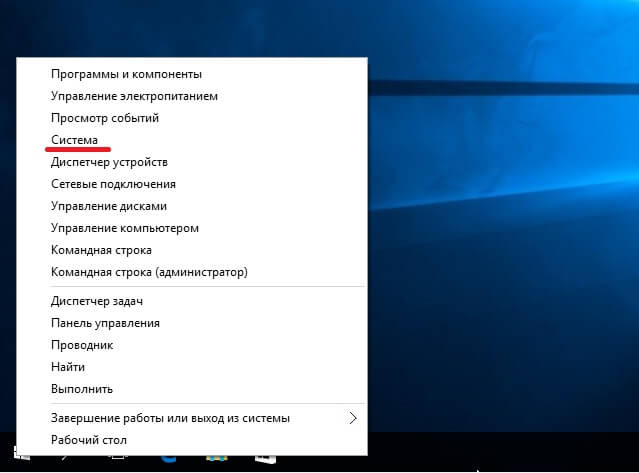
- Тапнуть кнопкой мышки по значку «Пуск».
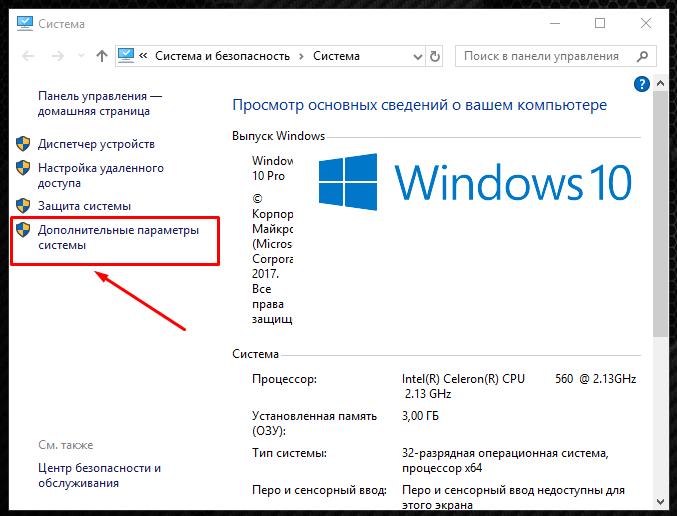
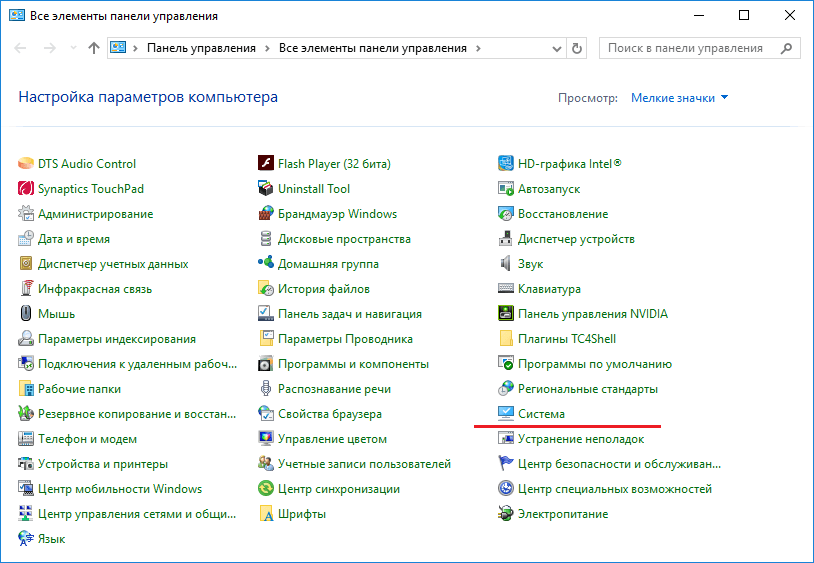
- В открывшемся окошке выбрать раздел «Система».
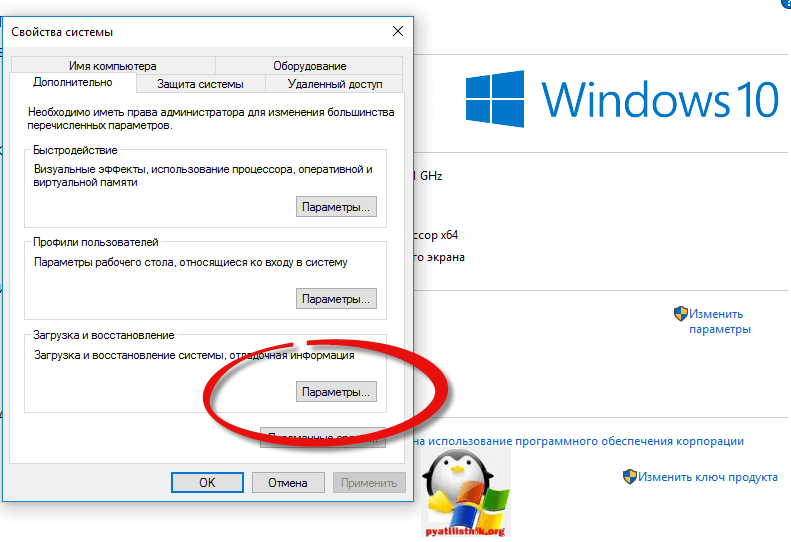
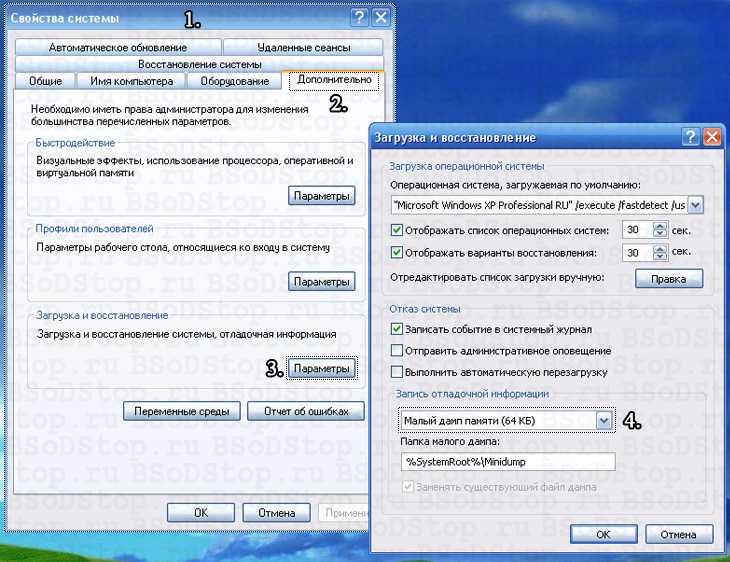
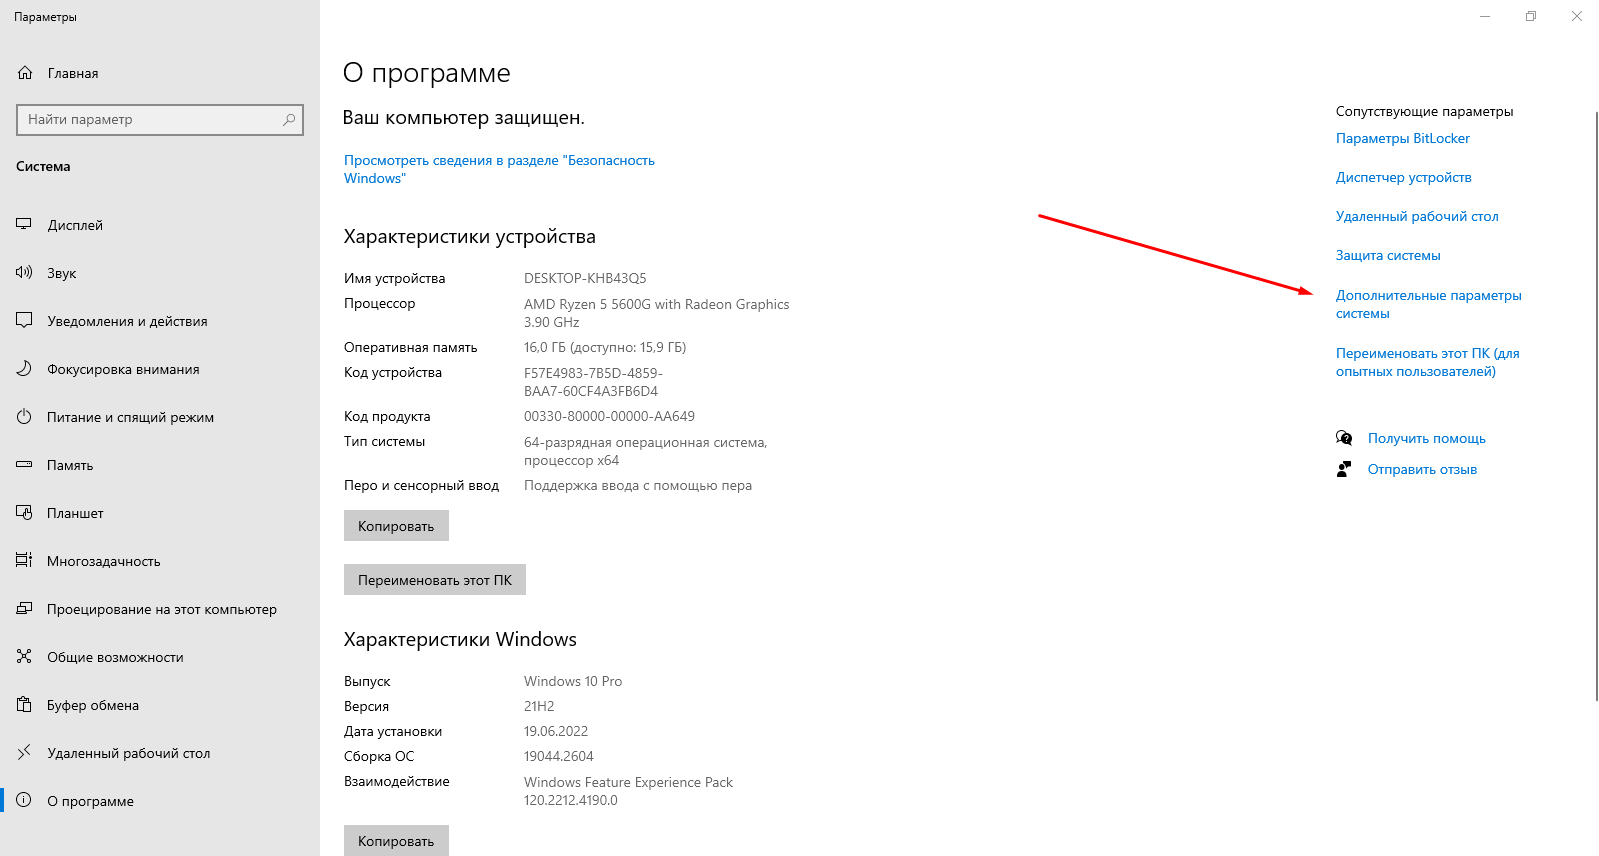
Далее выбрать раздел «Дополнительные параметры».

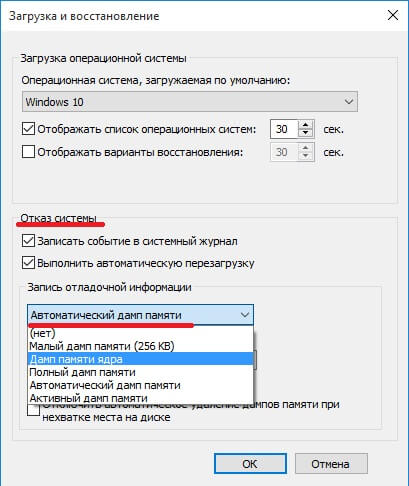
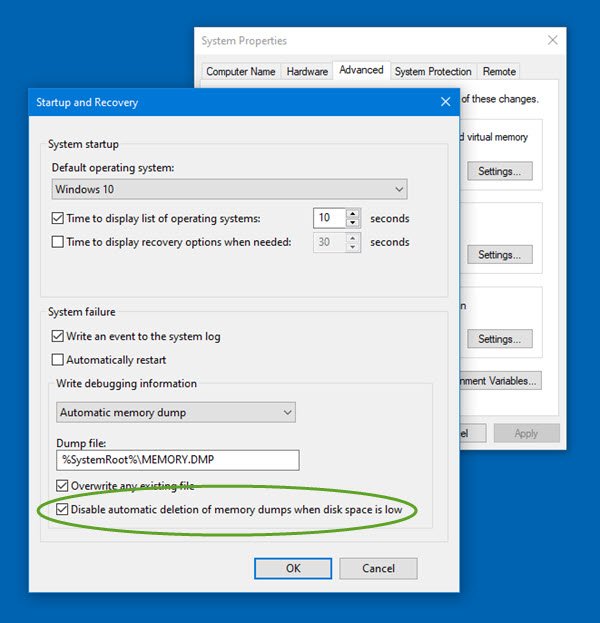
В открывшемся окне выбрать «Параметры».
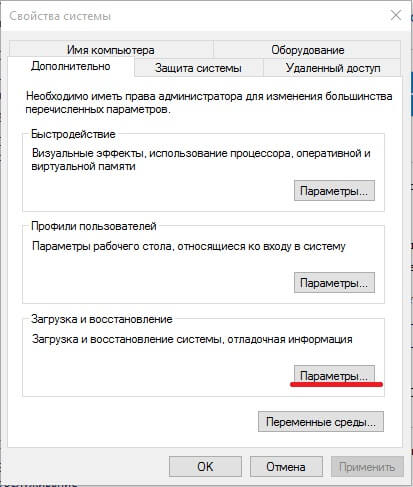
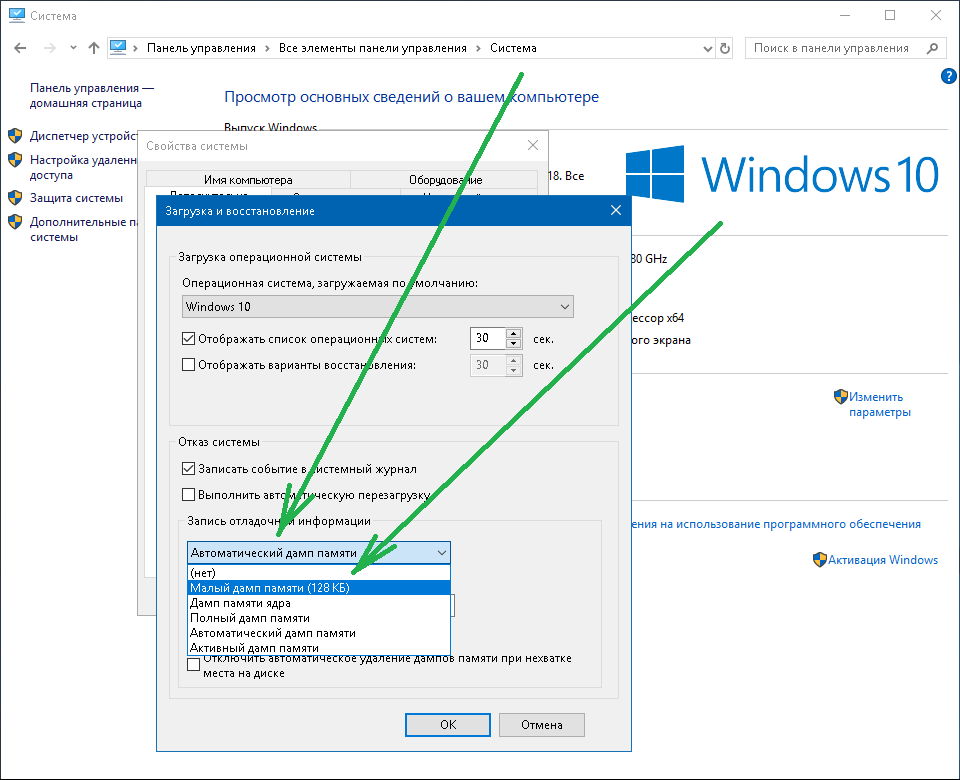
Настроить аварийный дамп.

Желательно ставить галочки напротив значений, связанных с созданием журнала, сохранением информации о системе. Данные при этом могут достигать нескольких сотен гигабайт. Поэтому целесообразно отметить маркером «Заменить существующий файл дампа».
Зная все о неполадках и причинах возникновения BSoD, будет легче исправить положение и вернуть рабочий режим системы.
What is .DMP file?#
Windows Memory Dump files with the .dmp extension are system files stored in a binary format. These files are automatically created if there’s an error or sudden crash of the third-party program or system feature.
They store the details about the crash, so most seasoned users will utilize .dmp files to troubleshoot the affected programs.
If there’s a BSOD (Blue Screen of Death), the details about the possible causes (drivers or other software are usual suspects) must be found in the automatically-generated .dmp file.
For obvious reasons, they are mostly named Memory.dmp or Crash.dmp, respectively. Size-wise, they might be small individually.
However, as they tend to pile up over time, DMP files can take up a lot of storage space when bundled. So, you can clean them up with ease with the Disk Cleanup utility.
Now, opening DMP files isn’t exactly simple since Windows 10 doesn’t offer a built-in tool. There’s a good reason for this, as most common users will not need or want to access them in the first place.
However, a few third-party utility tools should enable you to open and read DMP files.
How to Read and Analyze Minidump Files to Troubleshoot System Crashes
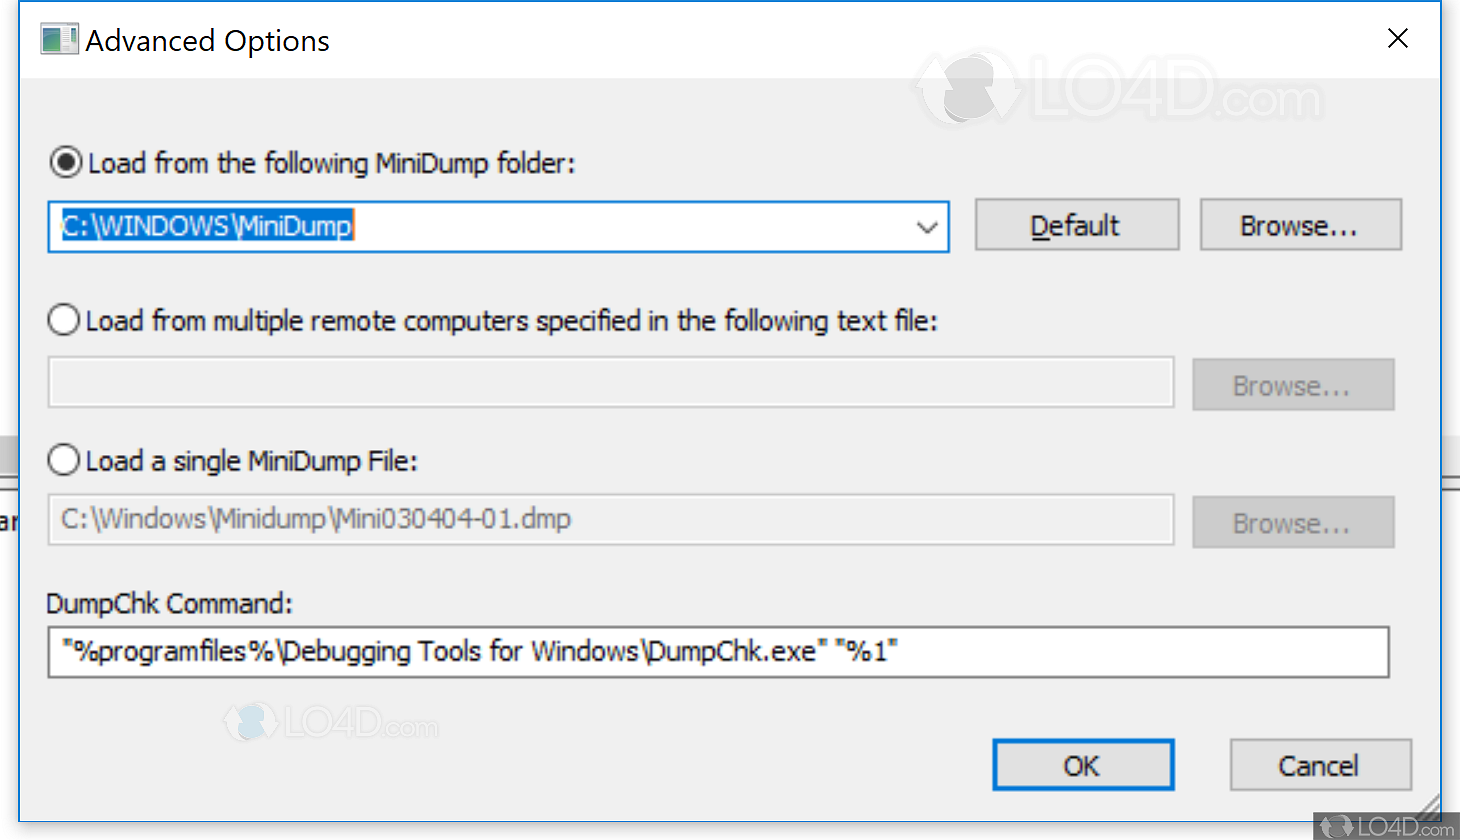
In order to view the information inside a minidump file, you’ll first need to open it. Luckily, WinDbg, included with the Windows Driver Kit, is capable of opening and analyzing minidump files in just a few short steps.
- Start by hitting the Windows key on your keyboard, and type “WinDbg” into the search box. If you do not already have the debugging tool installed, you will be redirected to install it.
- Open the Windows Debugger Program by right-clicking it and selecting “Run as Administrator”.
- In the menu bar, select “File,” then “Start Debugging” on the left.
- On the right, select “Open Dump File.”
- Look for the folder containing the desired dump file. As mentioned earlier, the default location for this is “%systemroot%\Minidump.” Double-click on the most recent minidump file. Opening the dmp file may take a few minutes.
- Near the bottom of the debugger window, type “!analyze -v” into the input box and press Enter. This will also take a few minutes to complete.
Now that the file is open, search for the headings labelled “MODULE_NAME” and “IMAGE_NAME.” These headings will indicate what program or driver is causing the problem, and potentially reveal some preliminary steps you can take to start addressing it.
Using a Third-Party App to Analyze and View Minidump (.dmp) Files – BlueScreenView
If you would rather use a third-party application to open the minidump files, then follow the steps below to install and use BlueScreenView.
- Download BlueScreenView from this website link. You will need to choose between the 32-bit and 64-bit option.
- Choose to save the file.
- Head to your downloads folder and right-click the file.
- Extract all of the files to an unzipped folder.
- In the unzipped folder, run the BlueScreenView application file.
- BlueScreenView will now automatically scan your minidump file.
- Crash details will be displayed in a list within the top window pane of BlueScreenView.
- In the lower window pane, you will see associated drivers with the crash.
- Double-click on the driver of the latest crash to see the properties of the errors in a neat table format.
In the table format, you will see the dmp file name, crash time, bug check, bug check code, parameters, which driver caused the crash, file version, and more.
If you want to send an HTML report to a technician for troubleshooting, just right-click the dump file and choose HTML Report – All Items. If this crash occurs regularly, you can save the reports for future debugging by right-clicking the Windows minidump file and choosing Save Selected Items.
How to use BlueScreenView to open a DMP file.
BlueScreenView is a user-friendly tool that simplifies the process of opening and analyzing DMP files in Windows 11 by automatically scanning and highlighting the file that caused the BSOD.
To get started, you’ll need to download and install BlueScreenView, which is available for free on the official website. Once installed, open the tool and it will automatically retrieve the dump files from your system. The tool will then display a list of all the DMP files, along with key information such as the date and time of the crash, the bug check code, and the file that caused the BSOD.
By clicking on a specific file in the list, you can view detailed information about the crash, including the drivers involved and the memory addresses. BlueScreenView also provides a handy event log view, which allows you to see all the crashes in a chronological order, making it easier to identify recurring issues.
With BlueScreenView, you can easily troubleshoot the error that caused the BSOD by analyzing the details provided. You can also export the information as HTML, XML, or text file, so you can share it with others for further assistance.


Просмотр и анализ файла мини-дампа
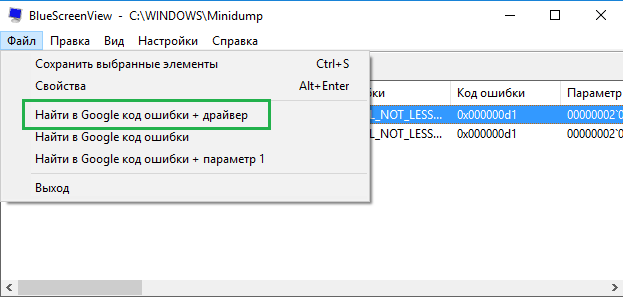
При выполнении операций с малым дампом можно воспользоваться доступной для любого пользователя утилитой Blue Screen View от Nirsoft. После открытия файла он четко укажет на имена этих драйверов. После нажатия на один из них появятся имена сервисов. Если юзер не может прочитать пути решения проблемы, он может воспользоваться поисковиком.
Пользователь может скачать ее с официального источника. Программа работает автономно, не требует скачивания дополнительных символов.
После запуска утилита сразу начнет сканировать директорию, где хранятся файлы дампа. Результаты анализа появятся в отдельной таблице, где будут указаны коды ошибок minidump и причины их появления. Проблемные участки будут выделены красным цветом.
Выполнение анализа и устранение ошибки:
- Для просмотра необходимо переместить файл в окно программы, после загрузится отладочная информация.
- Модули с ошибками высветятся красным цветом.

Тапнуть по имени мини-дампа, запустить поиск решения в Google, посмотреть варианты устранения проблемы.
В таких случаях среди подсвеченных проблемных драйверов находится истинный источник появления синего «экрана смерти». Для более точного анализа можно применить несколько вариантов анализа.

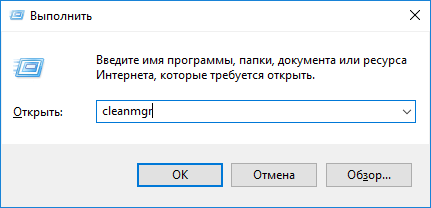
Как удалить этот файл
Если пользователю понадобилось удалить minidump, то выполняет он эту процедуру ручным способом. А именно: перейти по пути месторасположения файлов на диске: C:WindowsMinidump. Для удаления элементов minidump в каталоге Windows нужно воспользоваться встроенным инструментом системы «Очистка диска»:
- Вызвать командную строку.
- Ввести команду Cleanmpg.
- Тапнуть по кнопке очищения системных файлов.
- Найти в списке объекты, касающиеся мини-дампа, поставить галочки.
- Начнется удаление, которое потребует некоторое время.
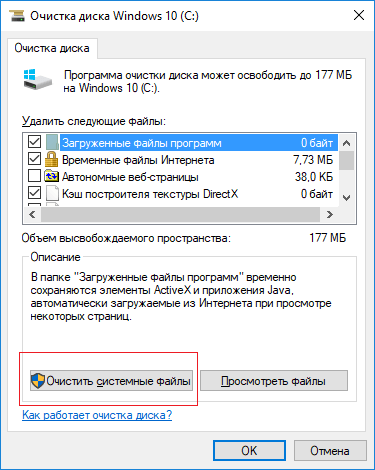
Если в списке нужных объектов не нашлось, это не означает, что они отсутствуют в системе. Скорей всего, они отключены пользователем или программами по очистке.
Дамп памяти в ОС Windows 10 – инструмент, помогающий диагностировать и устранять причины сбоев и появление BSoD. Если автоматическое создание и сохранение дампов памяти отключено, рекомендуется активировать их. Чаще причиной отключения файлов становятся утилиты для очистки ПК и оптимизации работы системы.
What is .DMP file?
Windows Memory Dump files with the .dmp extension are system files stored in a binary format. These files are automatically created if there’s an error or sudden crash of the third-party program or system feature.
They store the details about the crash, so most seasoned users will utilize .dmp files to troubleshoot the affected programs.
If there’s a BSOD (Blue Screen of Death), the details about the possible causes (drivers or other software are usual suspects) must be found in the automatically-generated .dmp file.
For obvious reasons, they are mostly named Memory.dmp or Crash.dmp, respectively. Size-wise, they might be small individually.
However, as they tend to pile up over time, DMP files can take up a lot of storage space when bundled. So, you can clean them up with ease with the Disk Cleanup utility.
Now, opening DMP files isn’t exactly simple since Windows 10 doesn’t offer a built-in tool. There’s a good reason for this, as most common users will not need or want to access them in the first place.
However, a few third-party utility tools should enable you to open and read DMP files.