Пошаговое управление файлами макетов PSD с помощью Photopea
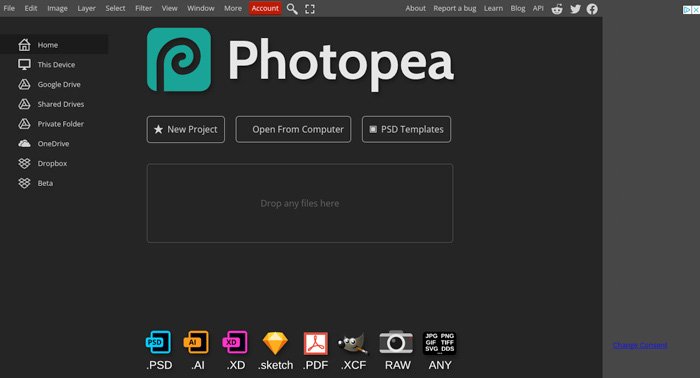
Когда вы загружаете страницу Photopea, она отображается, как и большинство программ Photoshop, с логотипом в центре. В верхнем левом углу выберите «Файл», чтобы открыть любой файл, совместимый с используемой вами программой редактирования.
Примером может быть выбор обложки журнала, она будет отредактирована и готова для вставки в файл мокапов.
Впоследствии некоторые макеты ищут в Интернете и работают как макеты дизайна для выбранного журнала
модели с расширением PSD doivent être загруженный в выбранной папке назначения, важно ее запомнить.
Вы возвращаетесь в онлайн-программу Photopea, чтобы найти и выбрать загруженный файл мокапов, снова введя «Файл» и «Открыть».
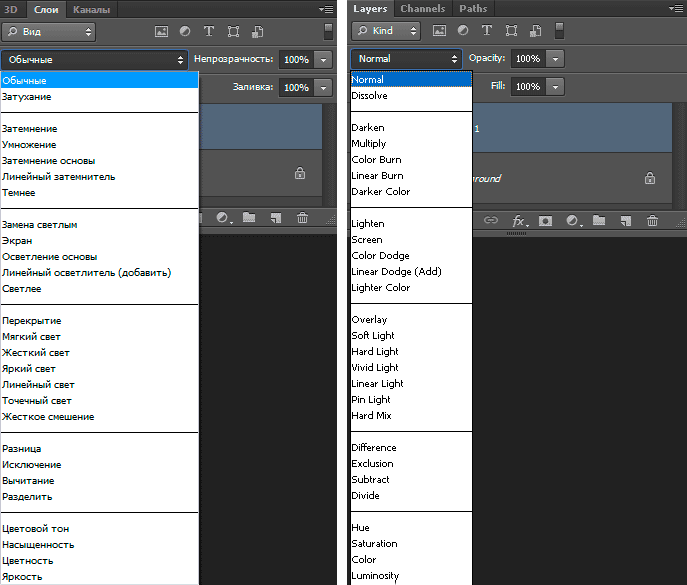
Когда модели находятся выбрано и открыто , все слои и правки файла будут отображены в правом разделе
Это умные элементы, которые вместе составляют разработанный макет, затем выбирается слой с изображением журнала.
Это изображение заменен тем, который был выбран ранее на первых шагах, упомянутых выше. Размер и последующие корректировки должны быть выполнены на этом этапе, убедившись, что он соответствует размерам макетов.
Наконец, он обрабатывается для сохранения измененного дизайна, чтобы завершить редактирование и можно было просмотреть работу.
Сказанное выше упоминает только работу над обложкой журнала в качестве примера. . Приложения Photopea может быть очень разнообразным и полезным для всех.
What Is Photopea and How Does It Work?
Photopea is a graphic design software that runs on the web. It is free and financed by advertisements; however, you can purchase a premium non-subscription version. Even a month of premium is less expensive than most design software that requires a subscription. Another advantage is that there are no fines if you opt not to pay.
If you only dabble in graphic design on occasion and can’t justify paying for a service you only use once in a while, Photopea is a terrific option. However, if you’re a regular user of other design tools, and especially if you’re paying a monthly fee that seems to be increasing, it’s a terrific option.
Although it is a web-based tool, certain browsers allow you to download and install it on your device. Photopea aspires to be the most powerful and cost-effective editing software available.
Часть 1. Простой обзор онлайн-редактора фотографий Photopea
Photopea это больше, чем бесплатный онлайн-редактор фотографий. Это позволяет вам управлять своими фотографиями с компьютера, Google Диска, OneDrive и т. д. Нужно ли вам редактировать JPG, TIFF, GIF, и другие общие форматы фотографий, или даже файлы PSD из Photoshop, файлы XCF из GIMP, и файлы Sketch из Sketch, вы можете просто редактировать их и управлять ими онлайн с помощью Photopea.
Отличные характеристики Photopea
1. Поддержка многослойного редактирования. Photopea не только позволяет вам управлять несколькими плеерами и использовать их для создания изображений, но также заполняет нужные слои цветом, узором и градиентом. Кроме того, есть растровые маски, векторные маски и смарт-объекты для более глубокого изучения функций слоя.
2. Предоставьте расширенные фильтры. Когда вам нужно применить некоторые расширенные фильтры, вы можете найти 3D, размытие, искажение, шум, пикселизацию, стилизацию, повышение резкости и другие с помощью Photopea онлайн. Уточнение края — один из самых популярных фильтров, когда вам нужно объединить разные объекты.
3. Удобные инструменты Hand/Zoom. Если вам нужно отредактировать детали портретного изображения или вам нужно легко управлять несколькими слоями, Рука инструмент и Zoom инструмент должен быть полезен для использования Photopea. Просто нажмите Ctrl + пробел клавиши для переключения на инструмент Масштаб и Пробел ключи к инструменту «Рука».
Простой обзор Photopea
Плюсы:
1. Поддержка широкого спектра форматов фотографий, включая несколько файлов проекта.
2. Редактируйте и управляйте фотографиями онлайн, не загружая дополнительное программное обеспечение.
3. Загрузите и импортируйте шаблоны PSD из Photopea для непосредственного редактирования.
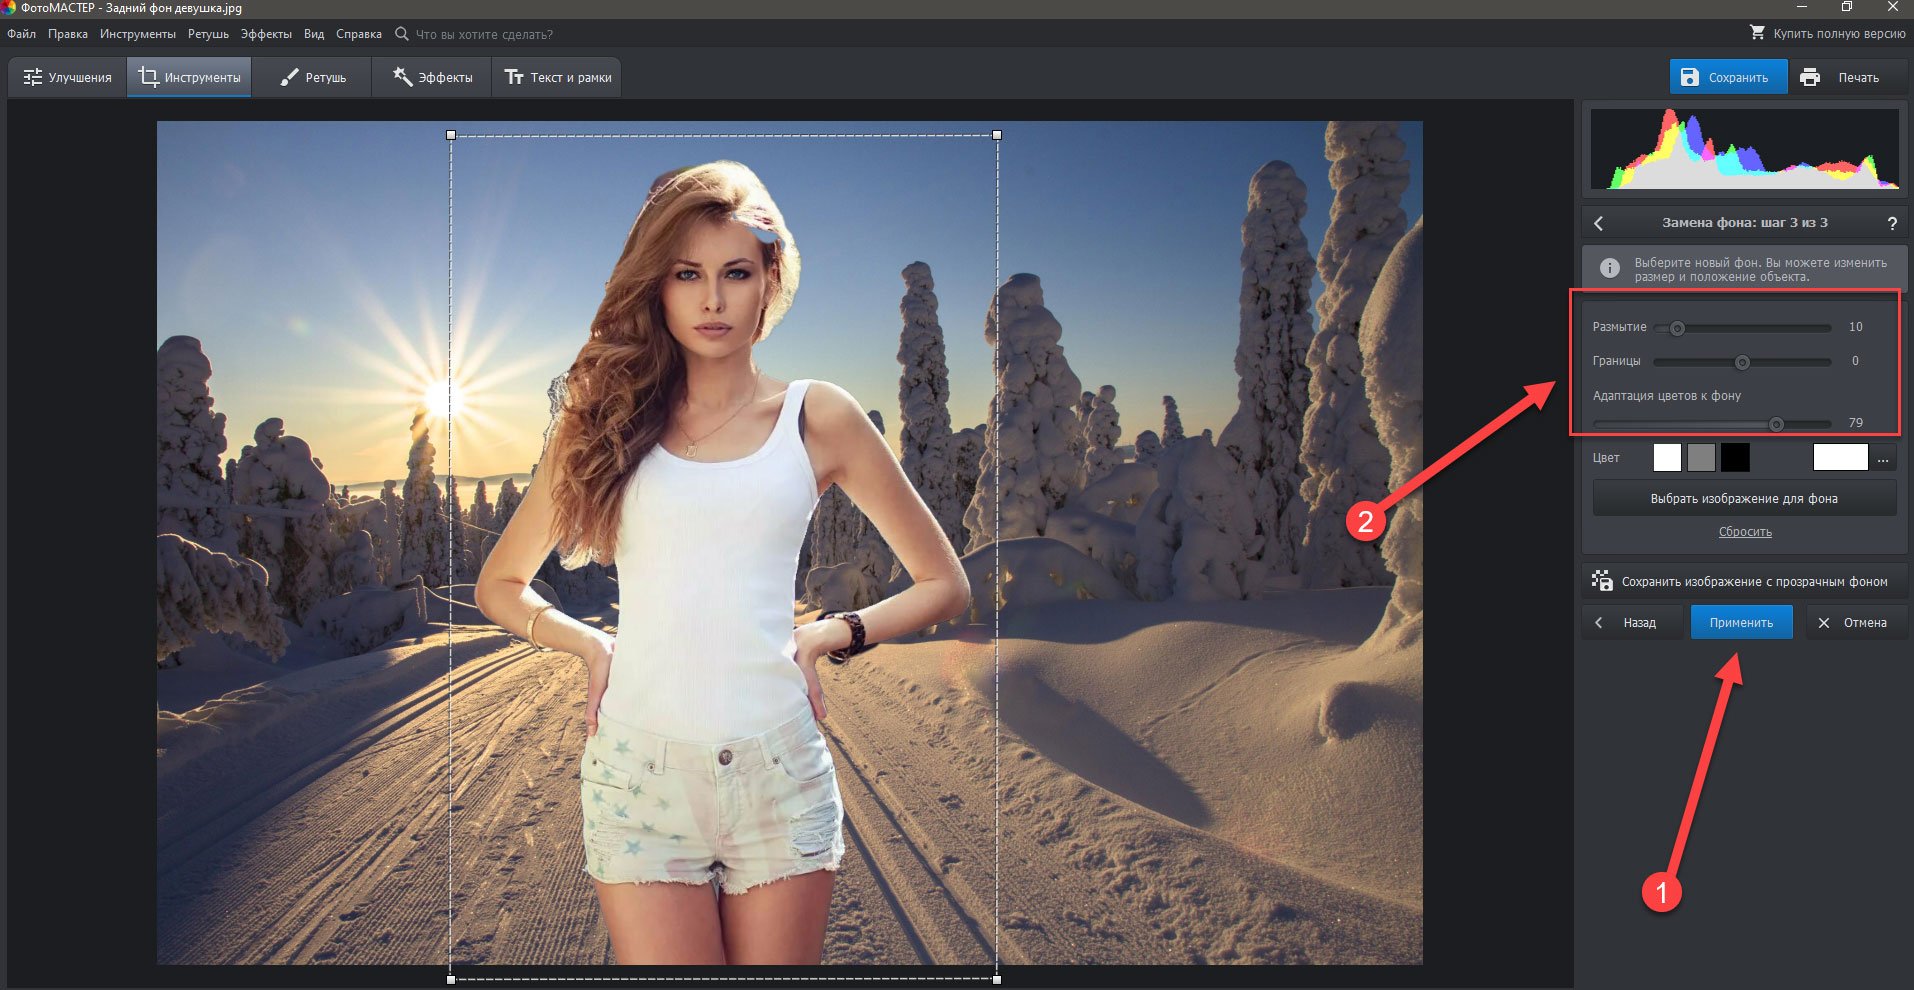
4. Обеспечьте несколько дополнительных инструментов уточнения краев для смешивания цветов на заднем плане.
5. Создайте плагины для Photopea и примените их через конфигурацию JSON.
Минусы:
1. Чрезвычайно низкая скорость, особенно для редактирования больших файлов PSD в Интернете.
2. Отсутствие некоторых функций ИИ и необходимость подписки на Премиум-сервис.
3. Трудно найти фильтры и функции, если вы не знакомы с PS.
4. Предоставлены ограниченные функции по сравнению с PS, такие как 3D-дизайн.
IV. How Can You Use Photopea for Your Research?
 Credits: author@scijournal.org
To get you started with Photopea, i’ll walk you through the process of setting up and navigating the tool, as well as demonstrate how to use some of its basic and advanced features.
Step 1: Accessing and Setting Up Photopea
Begin by launching your web browser of choice, be it Chrome, Safari, Firefox, or others. Enter the Photopea website URL in the search bar to access the tool.
This powerful online editing tool, conveniently available on the cloud, means no downloads or installations are needed, saving you valuable storage space on your device.
Step 2: Importing an Image
If you’re starting with an existing image, importing it into Photopea is a breeze. Navigate to the ‘File’ menu, select ‘Open’, and locate your image. Alternatively, you can use the intuitive drag-and-drop function to add your image into the Photopea workspace.
Step 3: Using Layers
Understanding layers is fundamental for creating intricate designs. In the ‘Layer’ tab, select ‘New’ to create a new layer for your bar graph. This function allows you to work on different elements of your graphic independently, minimizing the risk of accidental alterations.
Step 4: Creating the Bar Graph
The creation of your bar graph begins with the ‘Rectangle’ tool, found in the toolbar on the left. Use your mouse to click, hold, and drag to form a rectangle shape that will represent the first bar of your graph.
Duplicating this rectangle is straightforward. Press Ctrl+J (or Command+J on a Mac), which automatically creates a copy of the selected rectangle. Using the ‘Move’ tool, position your new bar adjacent to the original one. Repeat this process until you have enough bars to represent your data.
Each bar can represent different values. To reflect this, select a specific bar and use the ‘Transform’ controls to resize it. You can adjust the height to mirror the data value that the bar represents, creating an accurate, visually-pleasing graph.
Step 5: Adding and Manipulating Text
Labels and titles enhance the clarity of your graph. Select the ‘Text’ tool (the ‘T’ icon) from the toolbar and click on your canvas where you’d like your text. This could be data labels for your bars or a descriptive title for your graph.
Personalizing your text is simple. With the text selected, you have a range of formatting options in the top menu bar. Adjust the font style, size, and color to suit your preference. Don’t forget to consider readability, especially when selecting fonts and colors.
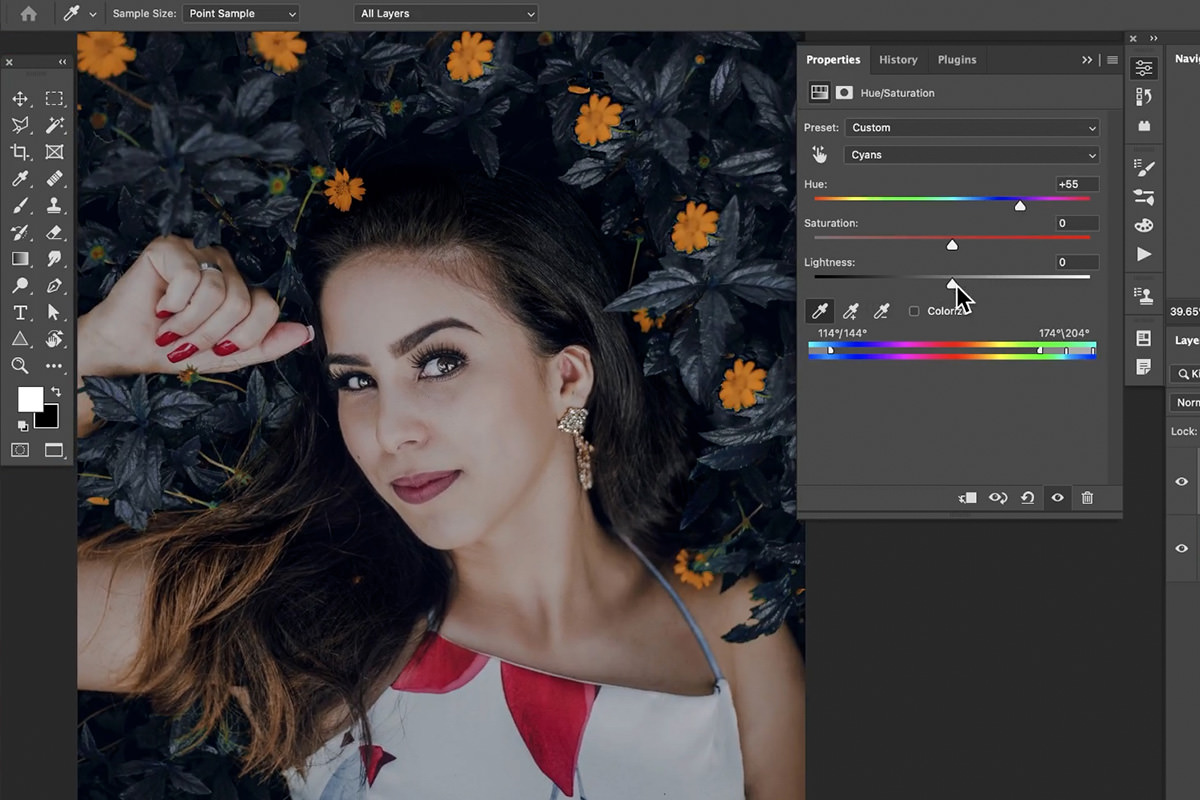
Step 6: Adjusting Color, Brightness, and Contrast
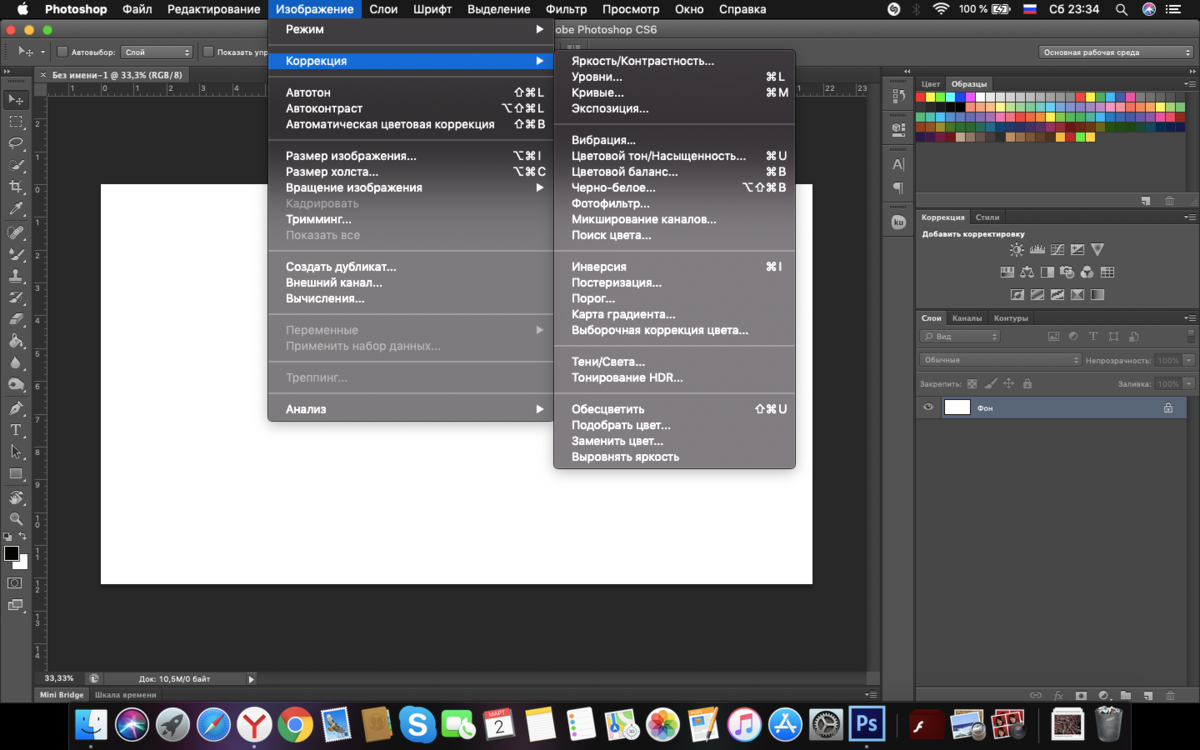
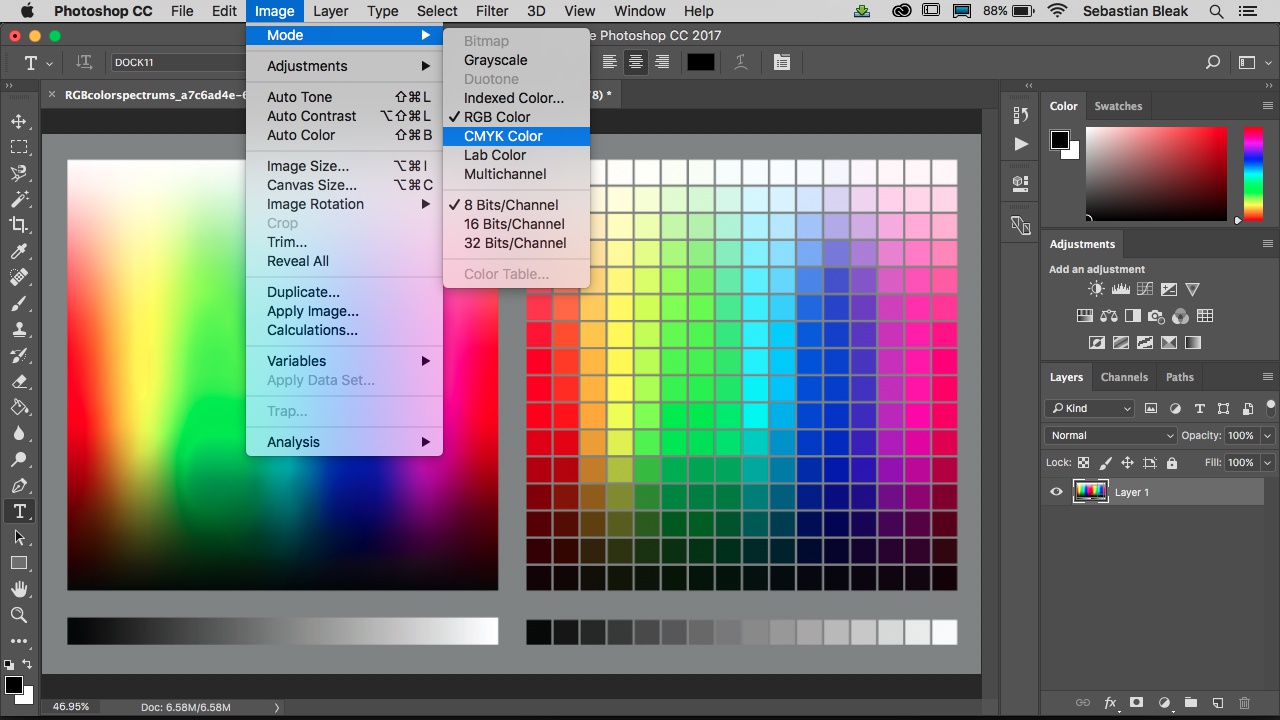
With your graph created, you may wish to tweak its appearance for better clarity or visual appeal. Select the layer you want to adjust and go to ‘Image’ > ‘Adjustments’.
Here you’ll find options for adjusting brightness, contrast, hue, saturation, and more. These adjustments can be critical in ensuring your graph is as clear and impactful as possible.
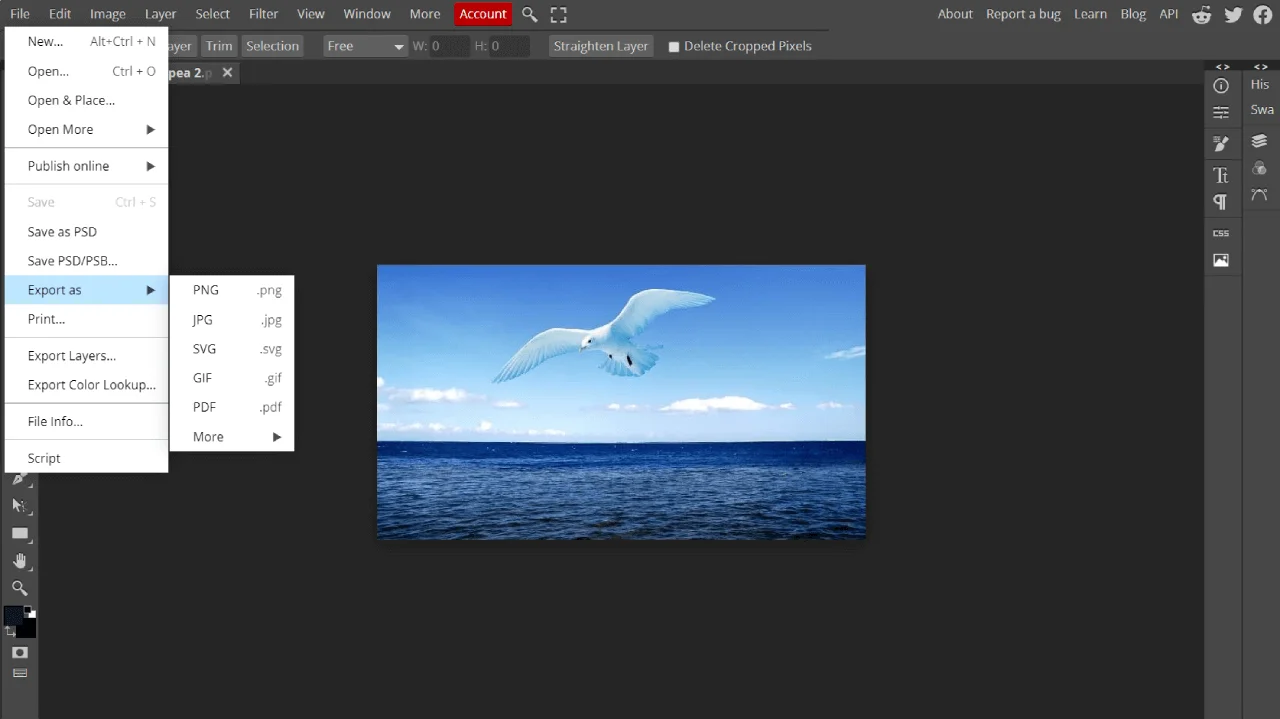
Step 7: Saving and Exporting Your Work
Finally, once you’re satisfied with your graph, you can save it. Click on ‘File’ > ‘Export As’ and choose your preferred format. Photopea supports a wide range of formats, including PNG, JPEG, SVG, and even PSD files for Photoshop compatibility.
You’ve now transformed your data into a professional-quality visual ready for incorporation into your research paper.
How to Use the Photopea Editor
In this tutorial, I’m just going to break down the quick and easy aspects. But in a nutshell, it has a lot of the same features and functionality as Photoshop, if you’ve ever used that software in the past.
Let’s say that I want to add an image to this blog post. In fact, let’s show an image of Photopea’s homepage to put underneath the first header.
Start by going to the website to open the image editor.
Open Photopea.com
1. Have the Image Ready
In this instance, I’m going to take a screenshot of the homepage of the image editor. Of course, you can use any image you’d like to follow along.
In this case, I saved the screenshot to my computer system.
2. Open Your Image File
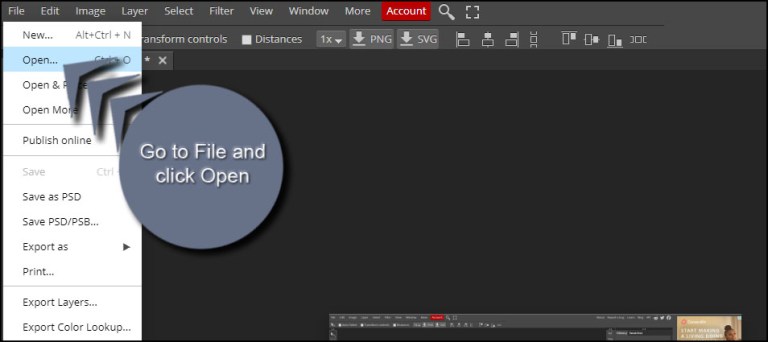
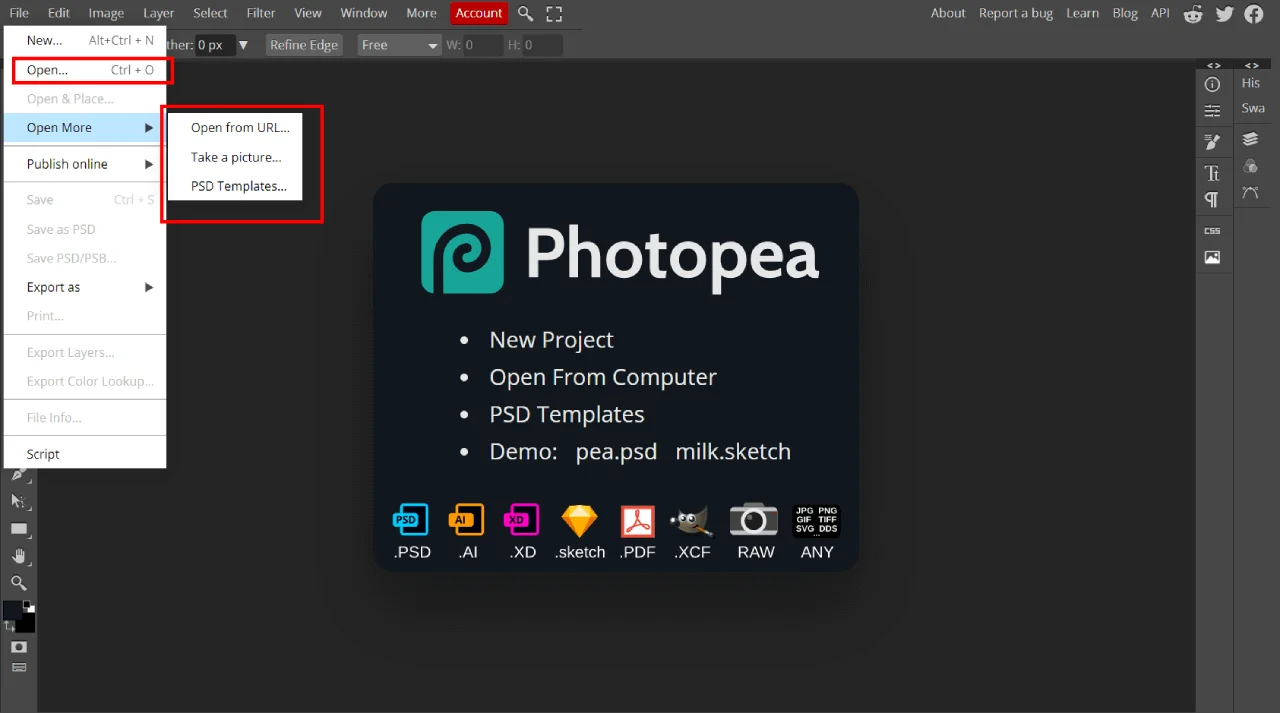
Go to “File” on the top left of the site and click, “Open.”
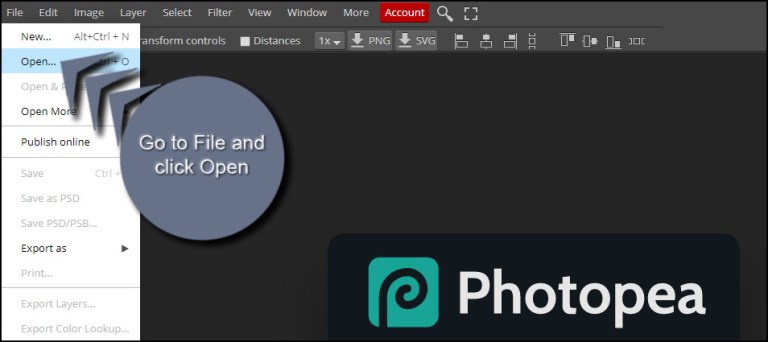
Add the image from your computer.
NOTE: Photopea also has the ability to open from a URL, taking a picture from your webcam, or PSD templates saved within its own system. This is located under, “Open More.”
3. Use the Photopea Editor
From here, you can make all kinds of adjustments using the tools on the left. This includes crop, clone, adding text, paint, select, and much more.
Resizing Images in Photopea
Having an idea about the best dimensions for your blog is a good idea. There is no one-size-fits-all answer here as it may depend on the topic, audience, theme, and overall layout of your site.
Let’s say I want to resize the image to fit on the website. After all, I optimize images for the Internet by making sure they are sized correctly for the page.
In this case, the image is slightly too large for my liking. I would rather it be 1024 wide. And when you’re trying to please the Google algorithm for website speed, every pixel counts in file size.
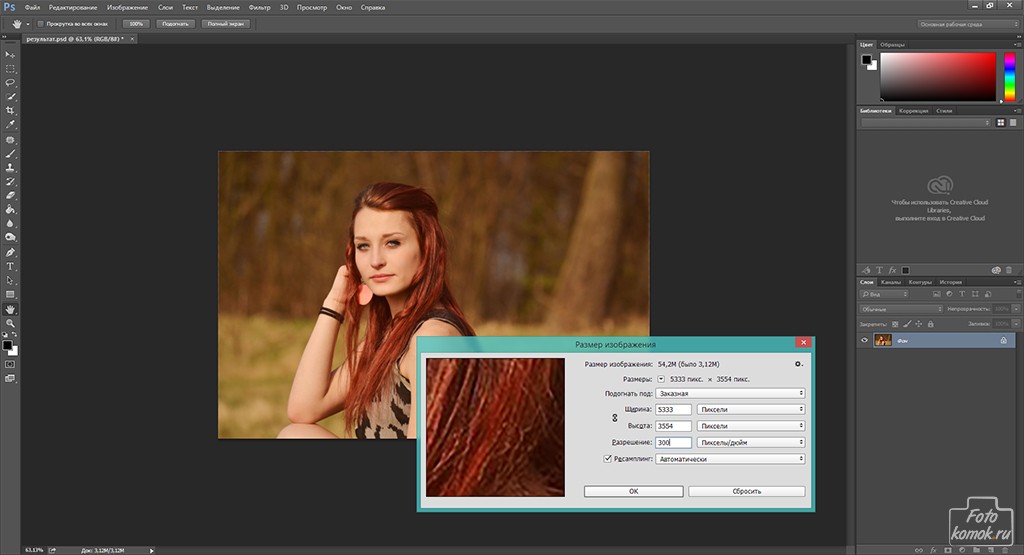
To resize an image in Photopea, go to the Image option on the top nave bar and click, “Image size.”
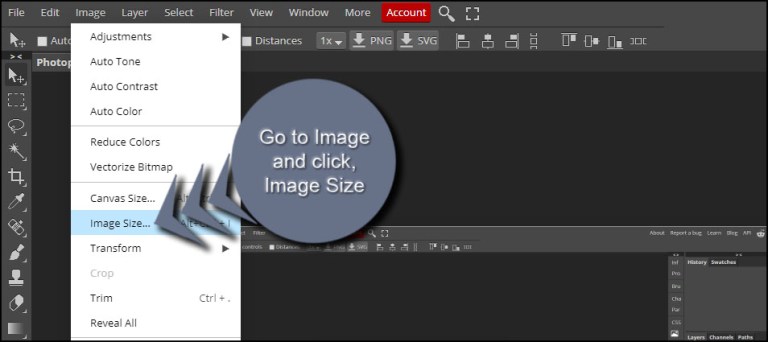
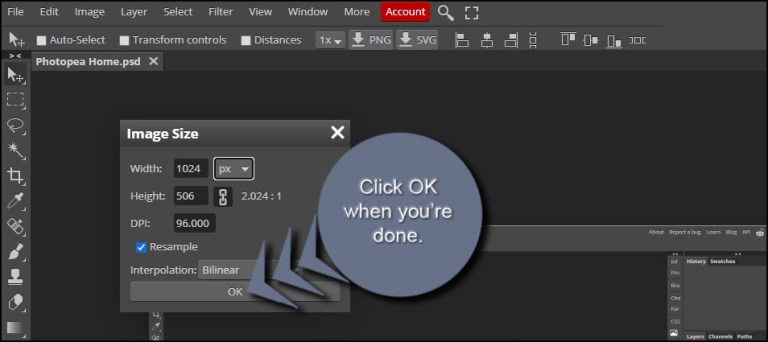
Adjust the width or height to fit your needs. You can also change the dimension type. This means you can choose to go by pixels, percentage of the original image, millimeters, or inches.

NOTE: If the chain icon is connected, it means Photopea will constrain proportions. This means that if you alter either Width or Height, the app will make corrections to the other accordingly so it doesn’t appear squished.
Once you made your adjustments, just hit the OK button.
4. Save Your File
When you’re ready to save your file in Photopea, you have a couple of different options. You can save as a PSD, PSD/PSB, or Export to a variety of file types.
For the sake of this tutorial, I’m just going to save it as a JPG.
Go to file, Export as, and choose your file type.
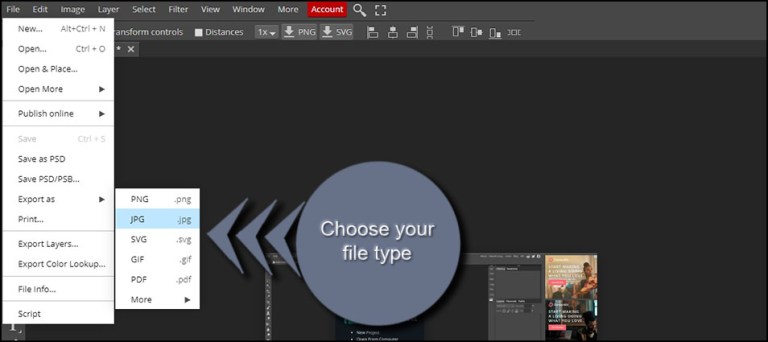
NOTE: If you go to the “More” list at the bottom, you can find a longer list of image file types, including WebP.
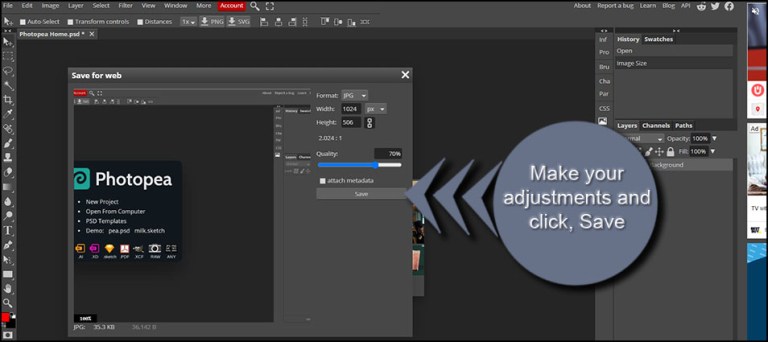
Depending on the image type, the app will ask you specifics about the file. In the case of a JPG, it’ll as for image quality, format, dimensions, and metadata.
Make your final adjustments and click, Save.
Your image is then saved to your device.
NOTE: I added the image I used in this example under the first header above.
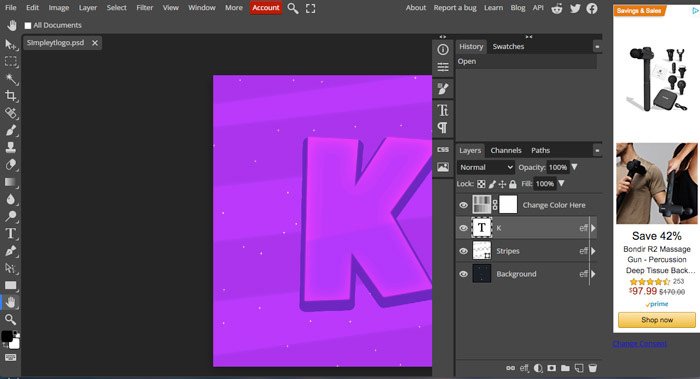
Using Photoshop PSD File Templates in Photopea
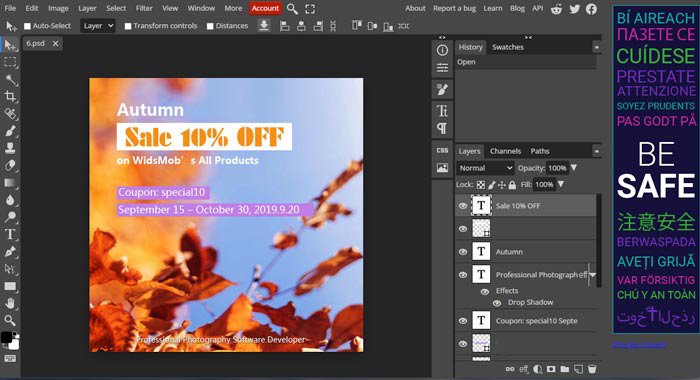
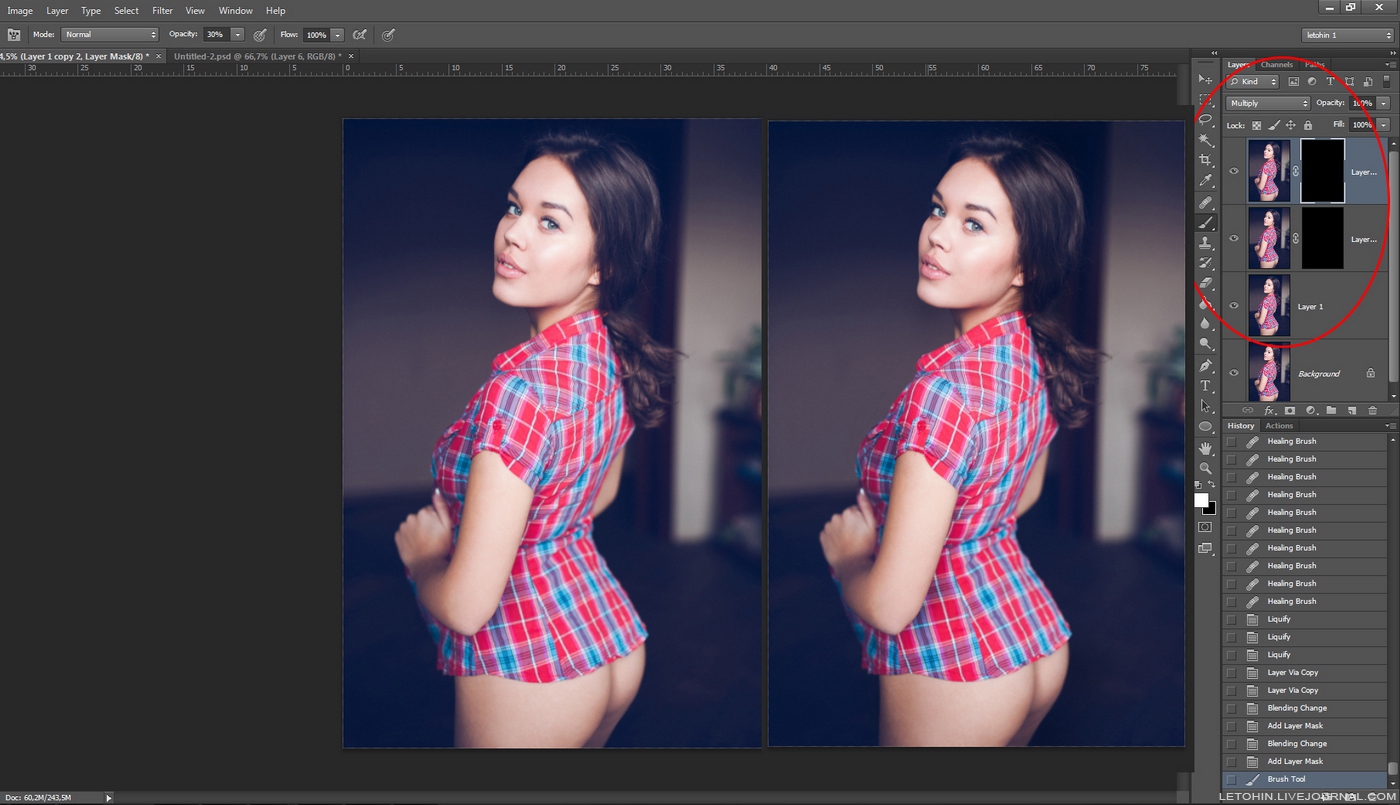
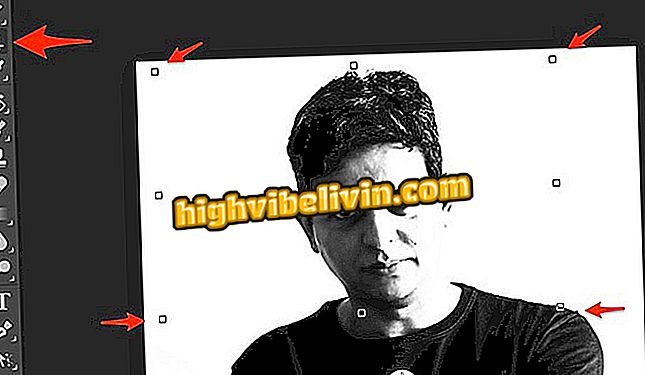
OK, what if you have a Photoshop PSD file to use as a blog template. For example, you can see throughout this entire article, I have a specific template I use for tutorials.
Every image with the grey circle and arrows is my image template as a PSD file.
Go to File and click, Open.
Select the PSD file you want to use in Photopea.
As you can see, Photopea includes all of the layers I created in Photoshop.
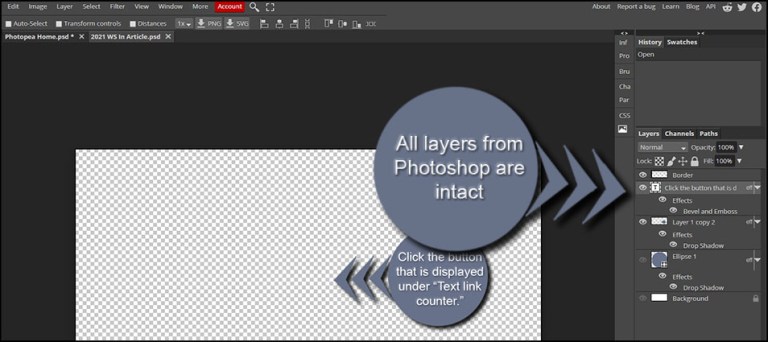
From here, you can make any edits necessary for your blog images.
It uses the same drag-and-drop functionality of Photoshop to move layers about. So, if you wanted one image in the back, you would drag it to the bottom of the list.
Do You Need to Download Photopea? How Do You Install the Photopea App?
As I said earlier, Photopea runs in your browser. You don’t need to download Photopea. There’s nothing to download.
That being said, you can “install” Photopea in Window. I put that in quotes because it’s a web app, not a native Windows app. This means you can make Photopea appear like a system app, with a desktop and Start menu icon and will appear in its own separate window, not as a browser tab.
It’s not a scam, it’s how web apps work.
So, here’s how to install Photopea:
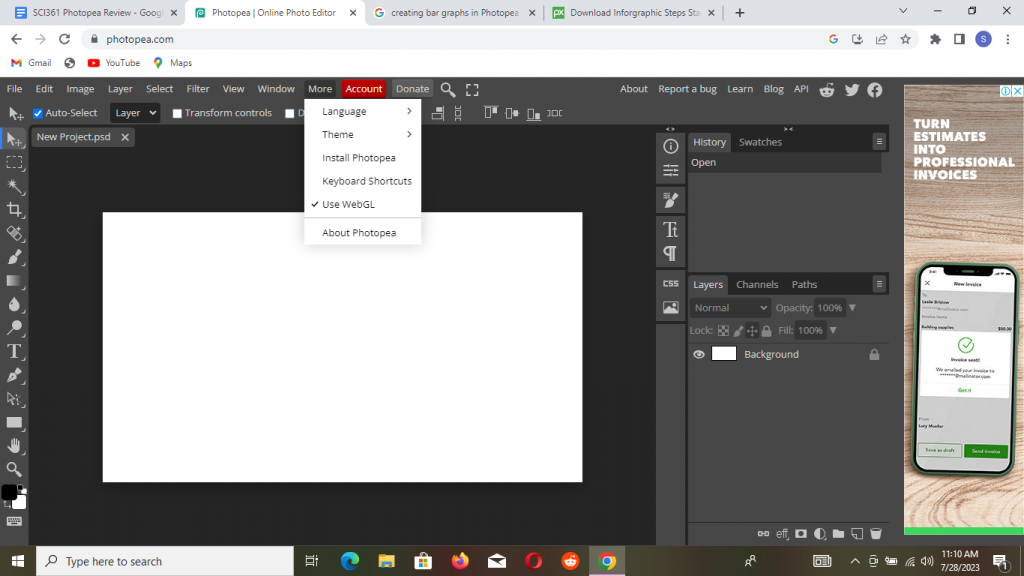
1. Open Photopea in your browser by visiting photopea.com.
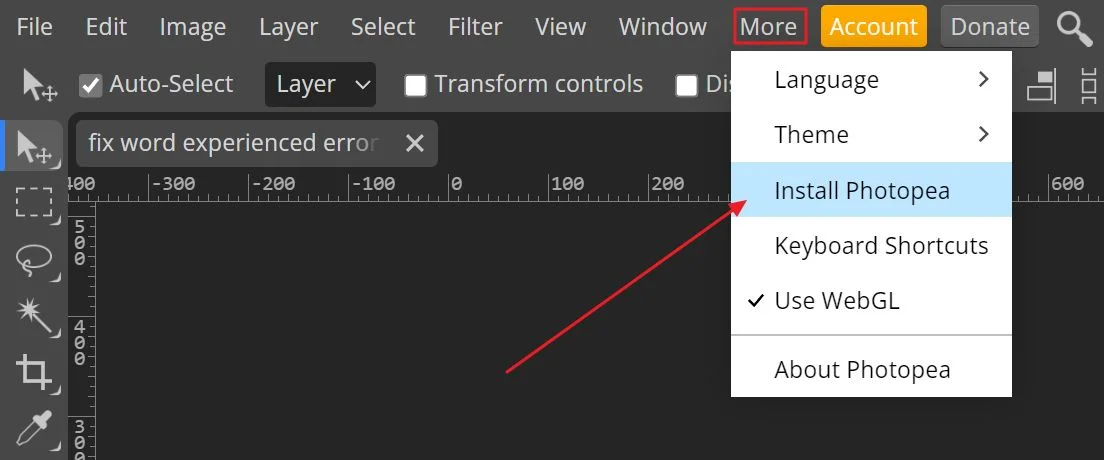
2. Click the More menu and select Install Photopea.
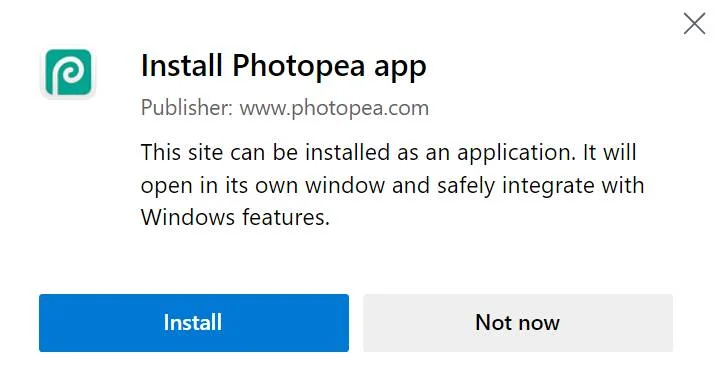
3. A prompt will appear. You need to confirm by clicking on Install.
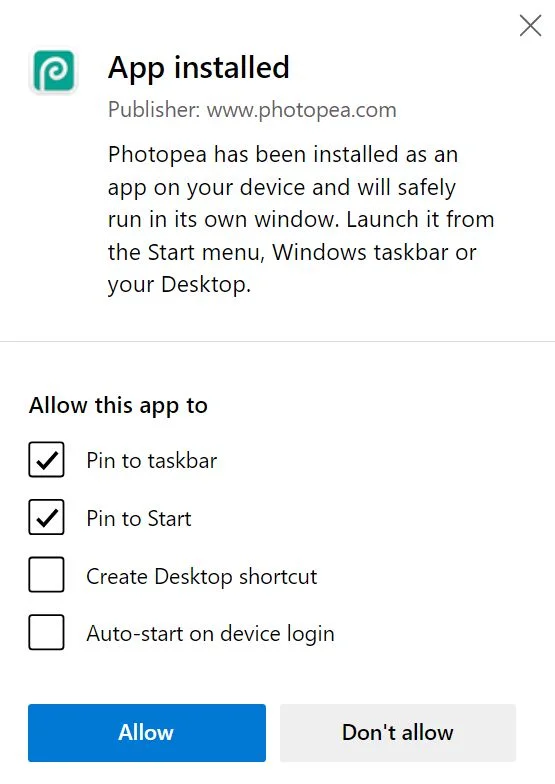
4. Another prompt will let you know the Photopea web app was installed. By default, it’s set to add an app icon on the Taskbar and the Start menu. You can opt to add one icon on the desktop and make the app start when you login (not necessary).
Now you have Photopea “installed”. As I said, you should only do this if you want quicker access to the app. If you’re only using it from time to time, it’s enough to just add the Photopea website to your browser favorites.
And speaking of which, Photopea works in all major browsers: Chrome, Firefox, Edge, Safari, and other Chromium clones.
Conclusion
Photopea is a highly valuable online application for photo editing, which has a generous free to use and the capacity to deliver good results. It does require manual editing, which can deter beginners and other users from giving it a try. However, if you’re someone who doesn’t want to invest too much into photo editing tools, Photopea is a strong choice indeed.
In terms of alternatives, VanceAI makes a good case too. It is a primarily online-based image editing and enhancement application which automatically processes images for you, thanks to its AI technology. VanceAI has high accessibility and is continuously growing as a platform. The paid plans here start at a mere $4.95 per month, which is encouraging.
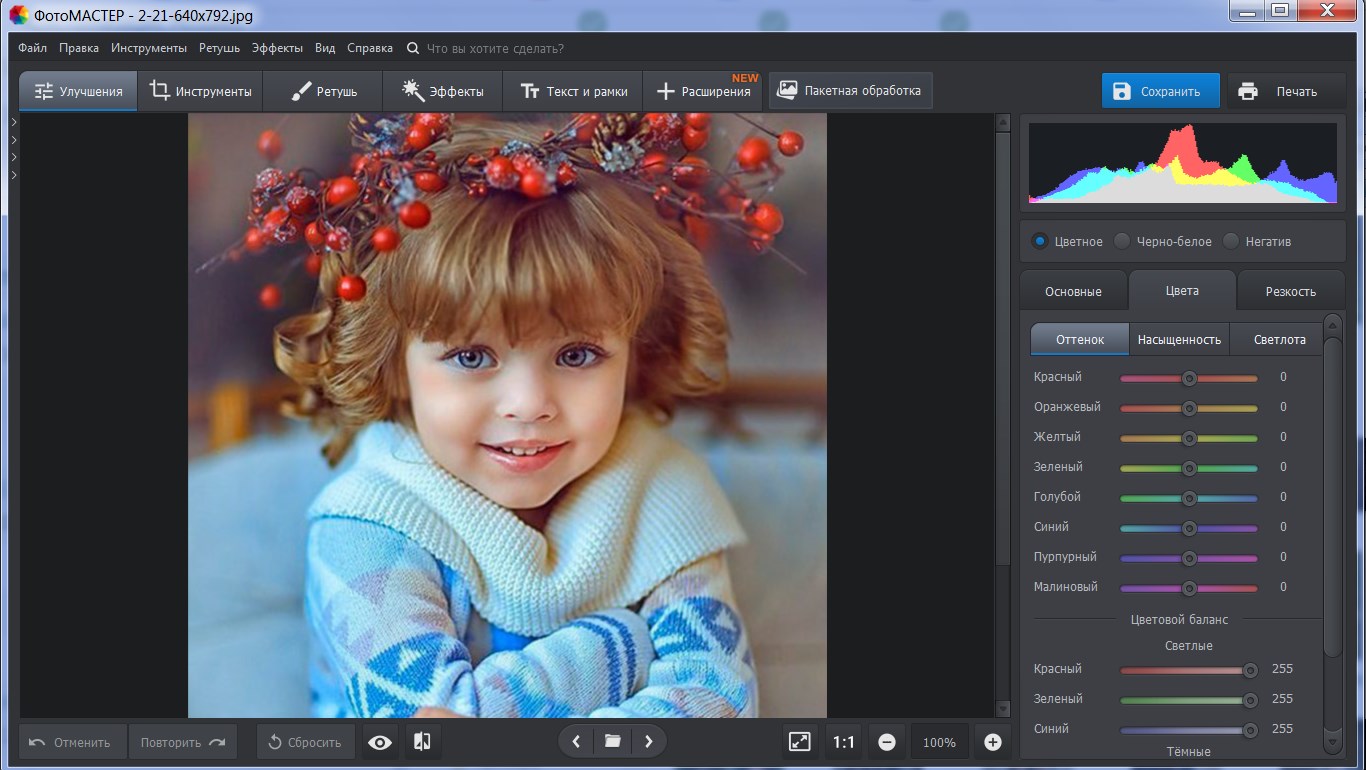
Использование инструментов редактирования Photopea
Шаг 1. На панели параметров в левой части экрана наведите указатель мыши на параметры, чтобы увидеть их имена и дополнительные функции. Первая опция представляет указатель инструмента по умолчанию. Затем пунктирная квадратная иконка указывает тип выделения, которое можно сделать в точках на изображении. Вы можете выбрать прямоугольный узор или выбор эллипса;
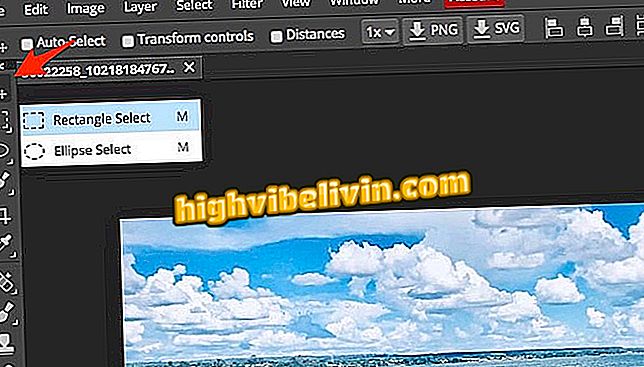
Параметры выбора типов в отредактированных изображениях в онлайн-сервисе Photopea
Шаг 2. Далее мы находим инструмент «Галстук». Позволяет создавать выборки от руки в «Выбор лассо», многоугольные выборки в «Выбор полигонального лассо» и магнитные в силуэтах «Выбор магнитного лассо»;
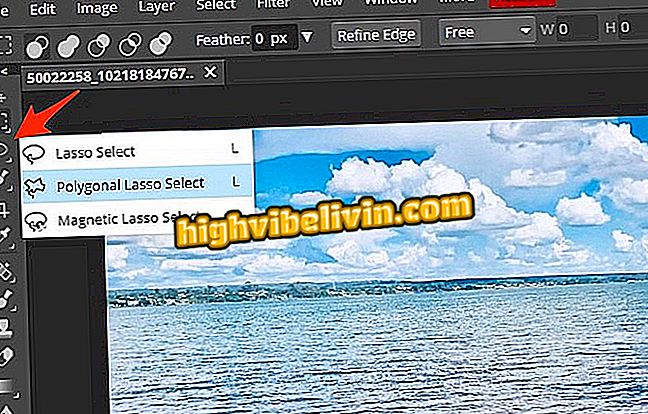
Photopea Online Service Tie Tool
Шаг 3. Выберите опцию обрезки и используйте края, вставленные в изображение, чтобы выбрать область, которую вы хотите обрезать. Вы также можете перетащить выделенную область в другие точки изображения. Чтобы подтвердить вырезание, используйте клавишу ввода на клавиатуре;
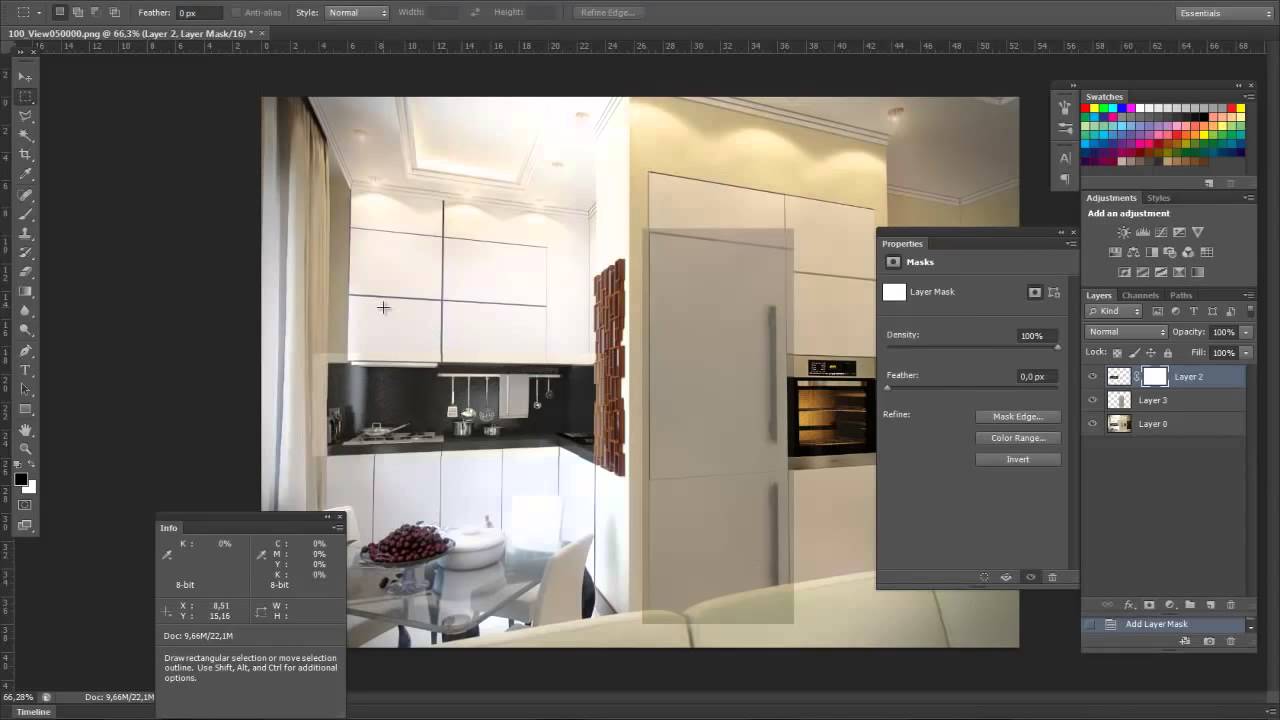
Photopea онлайн инструмент для резки изображений
Шаг 4. Следуя в панели, у нас есть «Пипетка», которая позволяет клонировать цвета определенных областей изображения. «Линейка» — это функция для использования линейок на экране редактирования, которая позволяет легче размещать изображения и другие перекрывающиеся элементы. При активации просто выберите точку на изображении и щелкните по ней, чтобы цвет автоматически добавлялся к текущему цвету инструментов кисти;
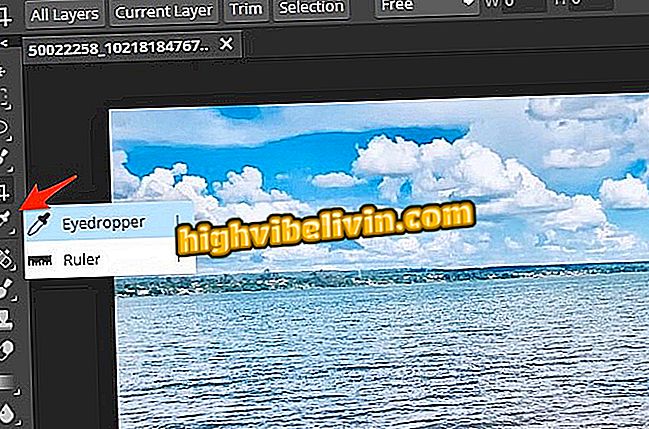
Параметры обрезки и клонирования цветов в Photopea
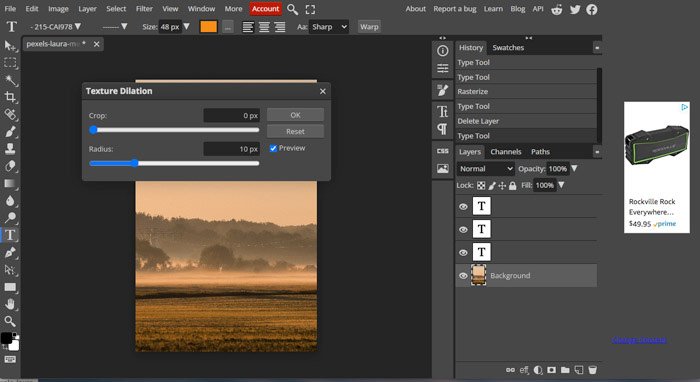
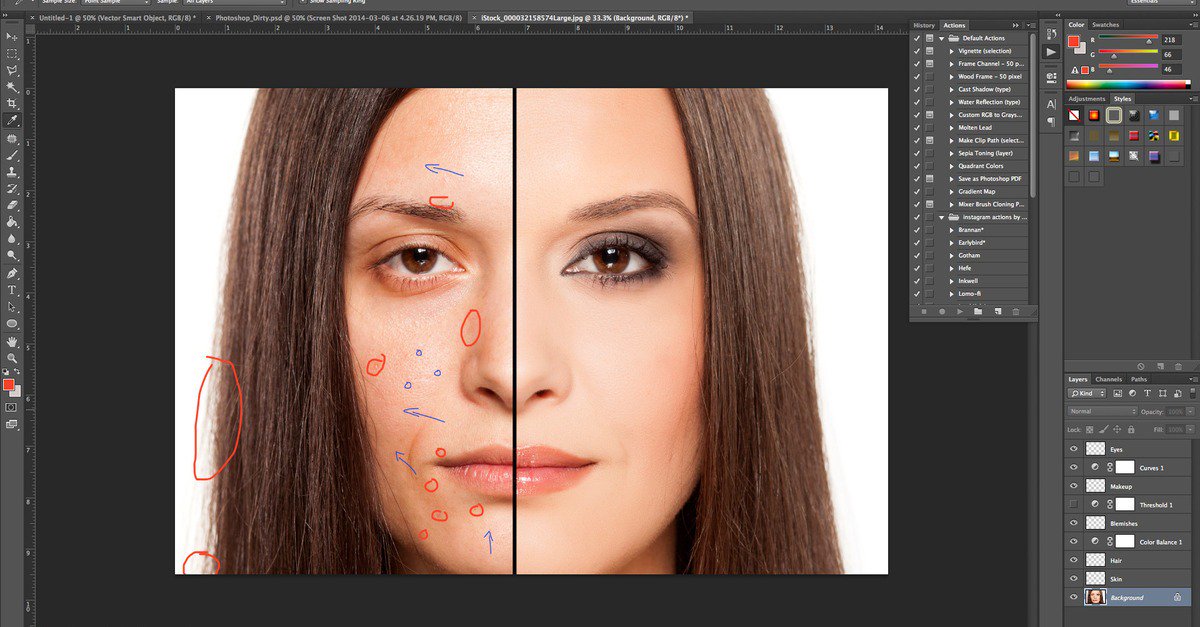
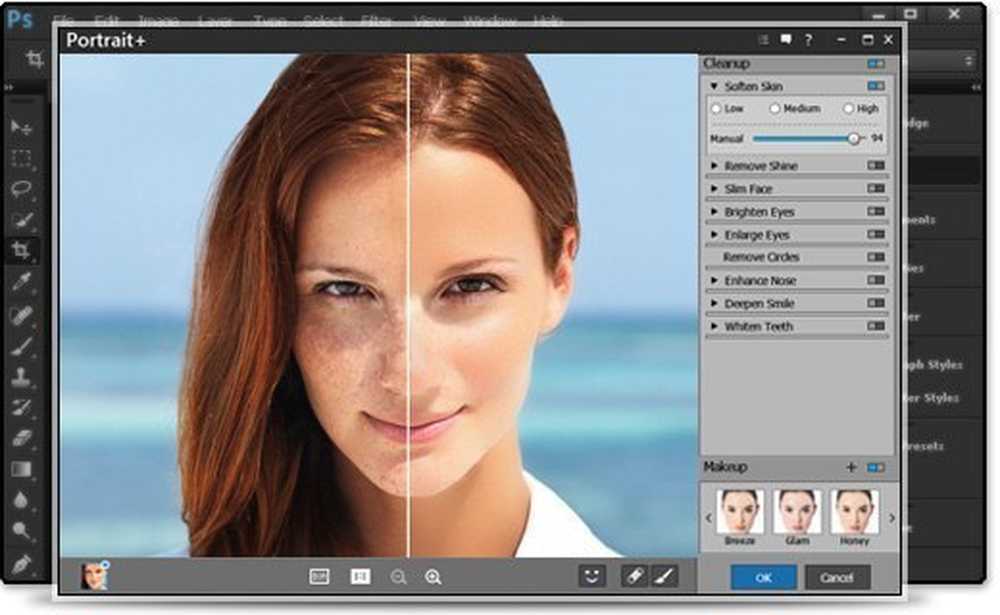
Шаг 5. Используйте лечебный значок, чтобы восстановить старые изображения или удалить пятна кожи на изображениях лиц. При срабатывании инструмент добавляет значок выделения, который автоматически применяет эффект после щелчка мышью;

Инструмент для чередования пикселей онлайн-сервиса Photopea
Шаг 6. Инструмент «Кисть» позволяет рисовать рисунки поверх изображения. Опция «Pencil Tool» оставляет обводку похожей на карандаш;

Кисть для онлайн-редактирования фотографий
Шаг 8. Значок пера позволяет создавать сложные рисунки, которые следуют более идеальному рисунку обводки с помощью параметра «Перо». В «Free Pen» вы можете использовать указатель мыши для создания рисунков вручную, но без той же точности, что и у предыдущего инструмента;

Photopea Service Pen Tool для онлайн редактирования фотографий
Шаг 9. Сервис по-прежнему позволяет добавлять «Тексты», использовать указатель для выбора и перемещения слоев, добавлять геометрические элементы, превращать мышь в инструмент масштабирования и сбрасывать текущий цвет кистей.
Другое Photopea онлайн инструмент для редактирования фотографий
Как пользоваться Фотопеей?
Фотопея — это своего рода онлайн-редактор фотографий, поэтому вам не нужно устанавливать какое-либо программное обеспечение. Кроме того, это бесплатный фоторедактор, поэтому нет необходимости создавать учетную запись. Вы можете использовать этот продвинутый фоторедактор с любым программным обеспечением для просмотра. Вот пошаговая процедура использования Фотопея ниже:
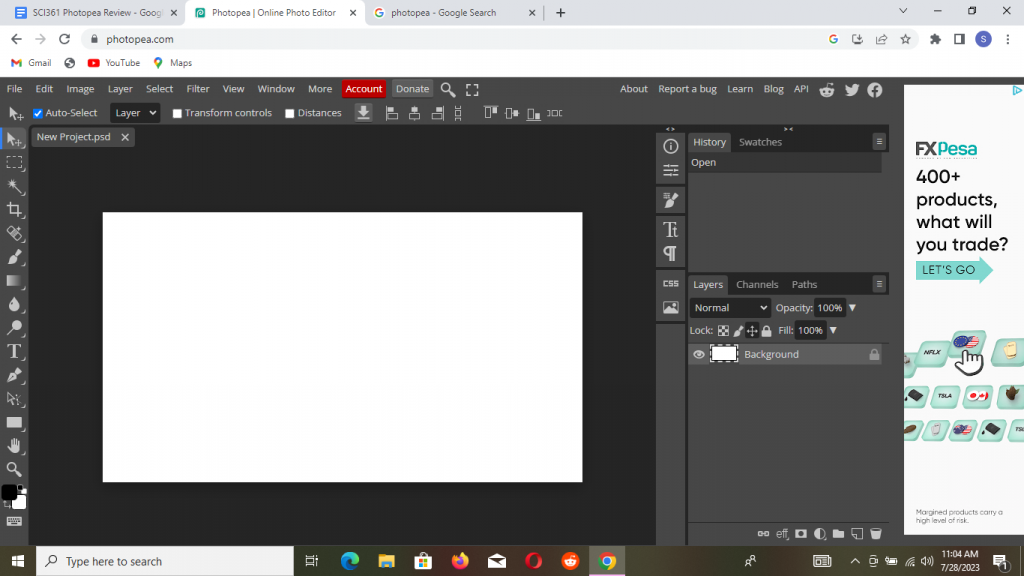
Шаг 2: Начать новый проект
Если вы хотите создать новый проект, просто нажмите кнопку Новый проект. Вы должны назвать файл и ширину, высоту и фон, а также существует множество размеров шаблонов. А также вы получите возможность выбрать тип размера файла, такой как обложка страницы Facebook, история Instagram, заголовок Twitter и т. Д. После того, как весь этот процесс будет завершен, нажмите кнопку «Создать», и слева откроется окно. окно есть несколько инструментов для редактирования.
Шаг 3: Импорт изображения
Вы можете импортировать целевое изображение здесь двумя способами для редактирования. Вы можете импортировать изображения, загружая их со своего компьютера или через систему Drug and Drop. Он подходит для формата файлов PSD, а также для файлов JPEG, PNG и других типов файлов изображений.
Шаг 4: отредактируйте изображение
В зависимости от ваших потребностей вы можете использовать один или оба инструмента редактирования, расположенные вверху или слева; большинство функций сравнимы с теми, что есть в программном обеспечении Photoshop.
Шаг 5: Экспорт изображения
Экспортируйте изображение после завершения изображения. Вы можете сохранить файл в формате PSD, JPG, PNG, PDF, SVG или даже в формате GIF. Если у вас есть минимальные представления об использовании Photoshop, вам будет намного проще использовать этот онлайн-редактор фотографий.

Проверьте учебник: Как сделать миниатюру YouTube с помощью Фотопея?
Возможности для профессионалов
Photopea предлагает широкий набор инструментов и функций, которые могут удовлетворить потребности профессиональных фотографов и дизайнеров. Это полнофункциональный редактор изображений, который может обрабатывать сложные задачи и выполнять сложные операции редактирования.
С помощью Photopea профессионалы могут выполнять следующие действия:
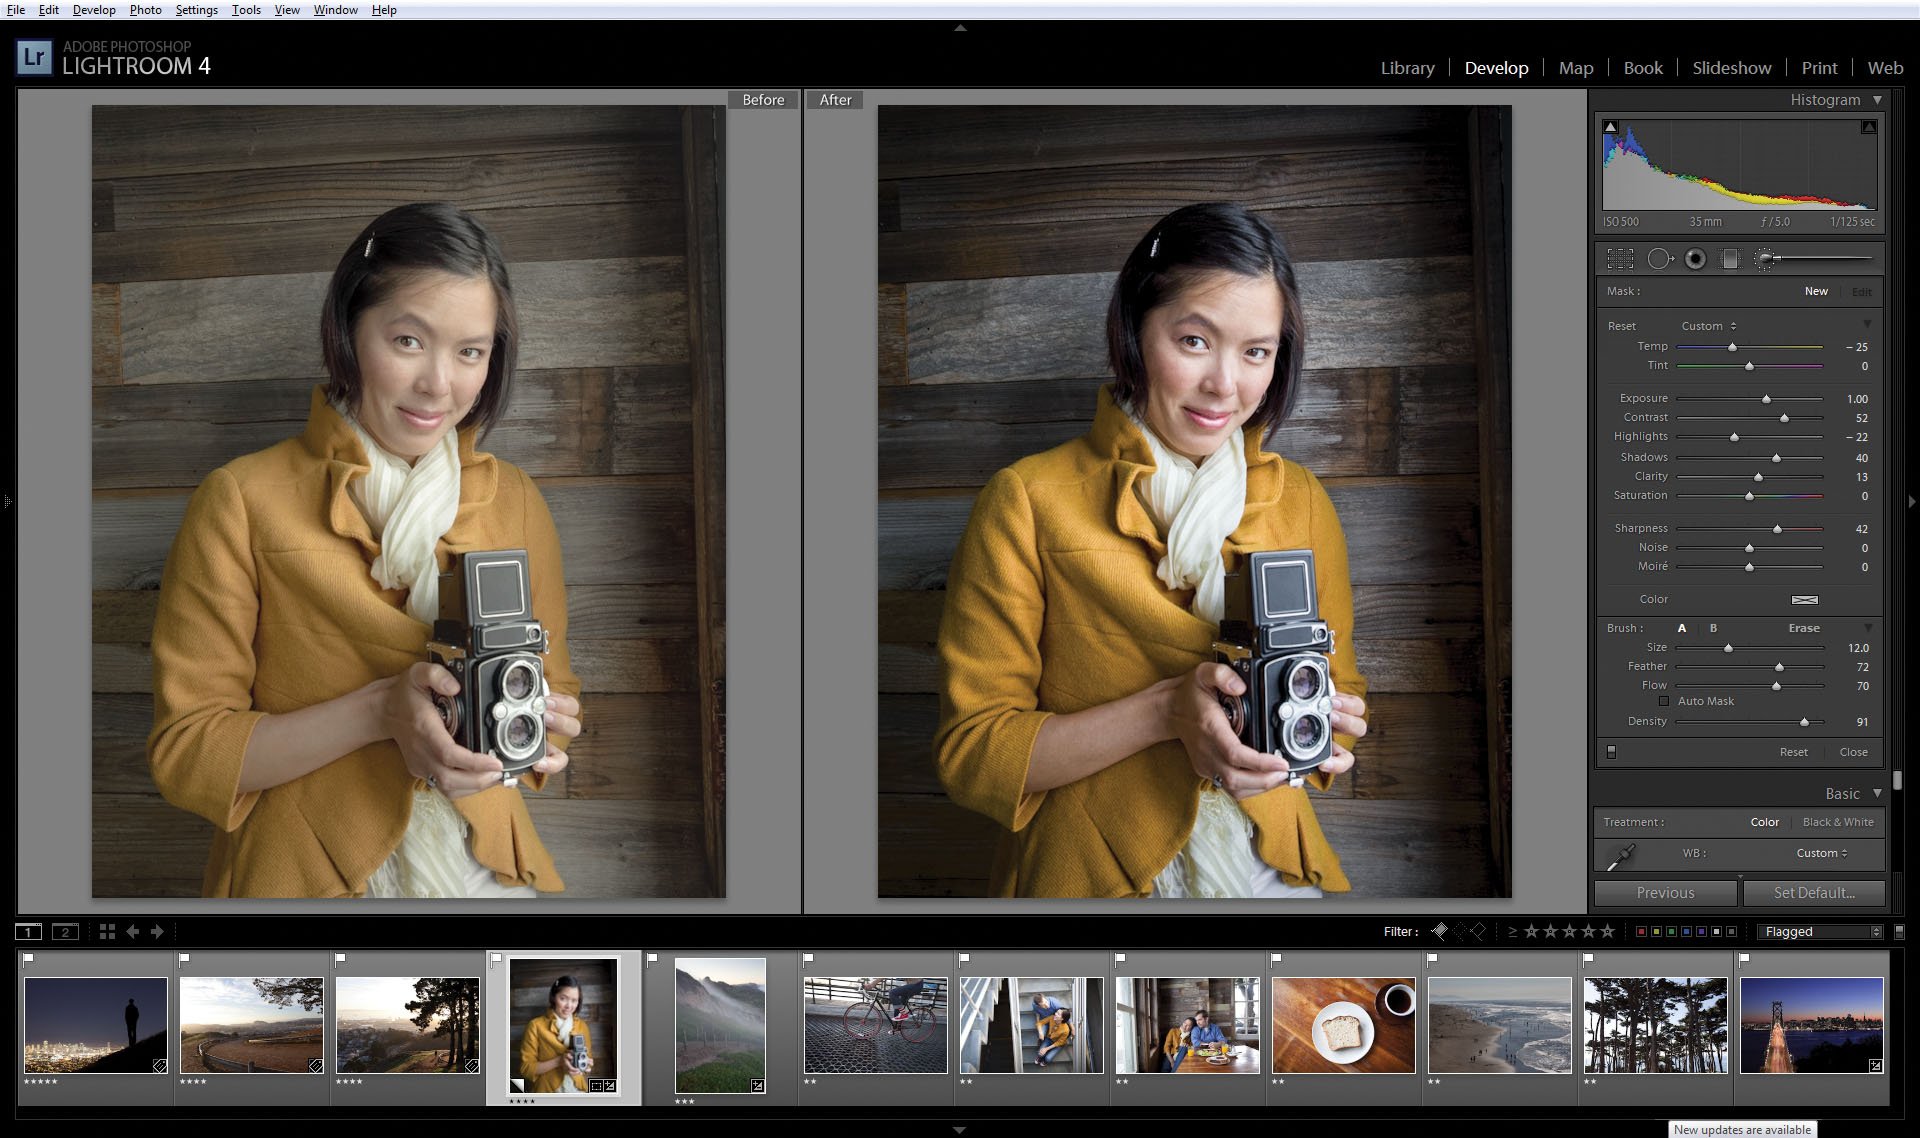
1. Ретушь и коррекция: Photopea предлагает широкий набор инструментов для ретуши, чтобы сделать изображения более привлекательными и совершенными. Вы можете убирать несовершенства кожи, выравнивать цвета, исправлять перспективу и многое другое.
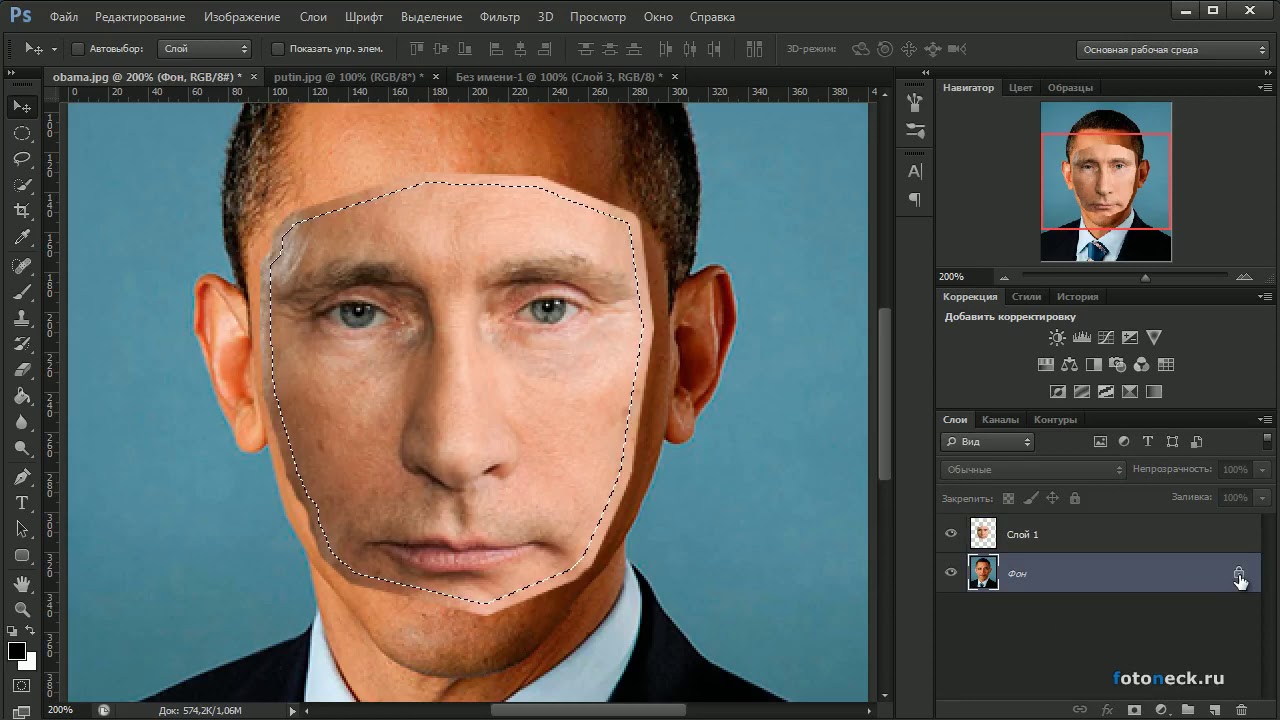
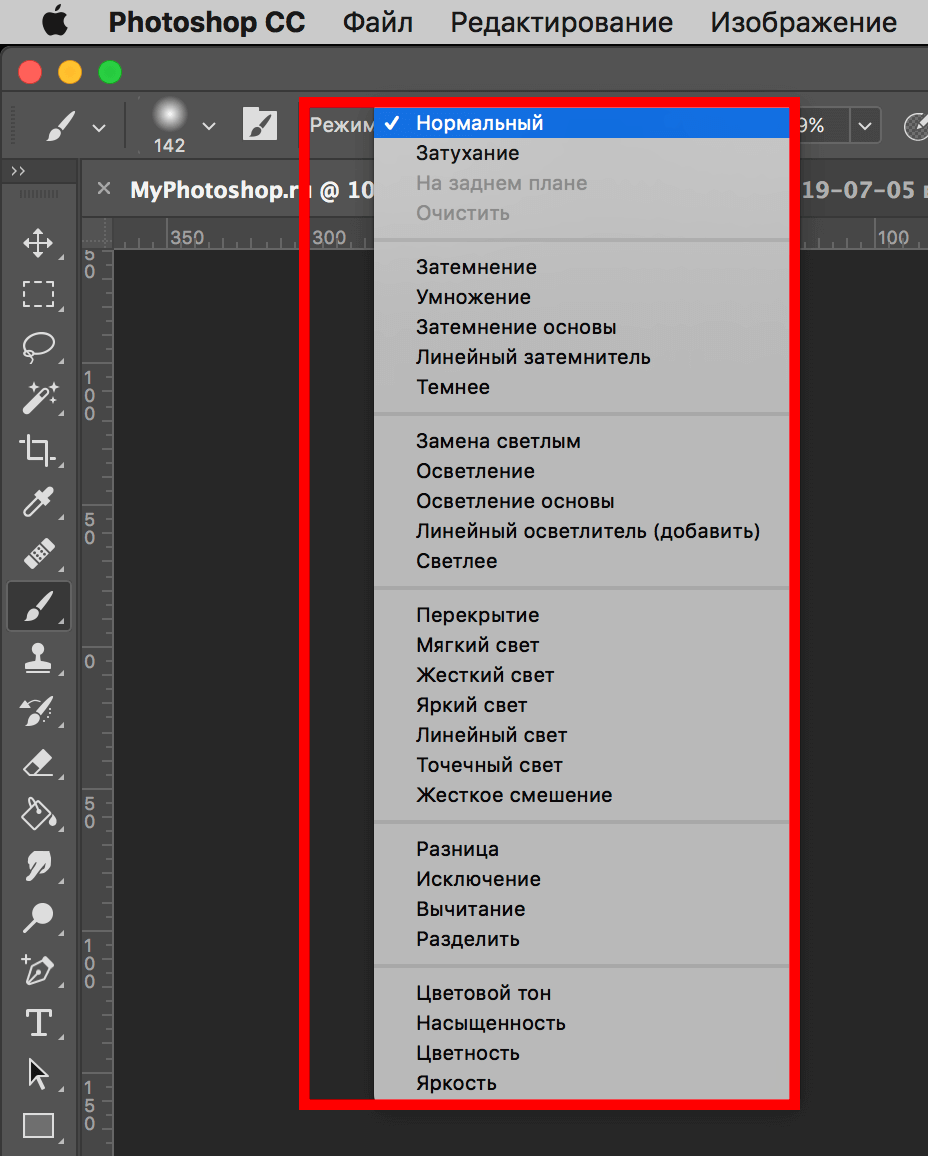
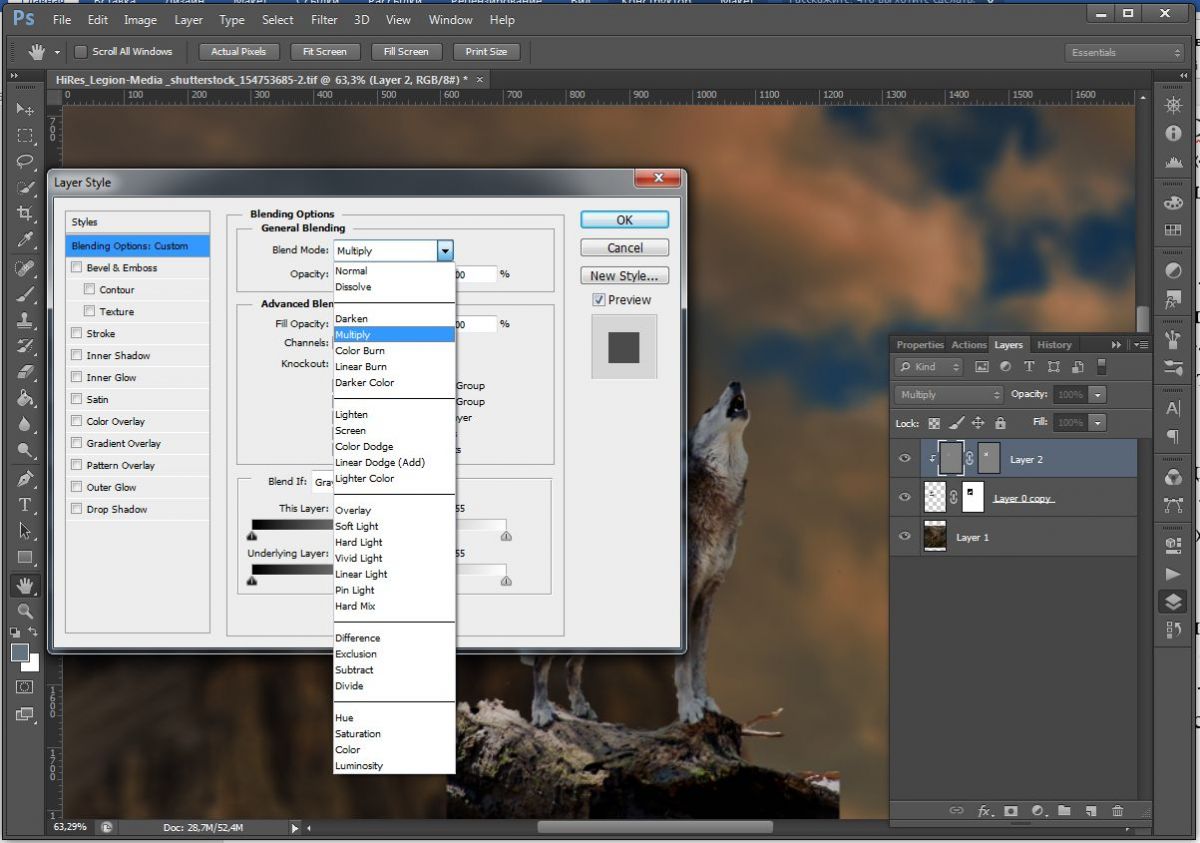
2. Монтаж и композиция: Photopea предлагает функции слоев с многочисленными режимами наложения, которые позволяют создавать сложные монтажи и композиции из нескольких изображений. Вы можете свободно перемещать, изменять размер и смешивать слои, чтобы создать уникальные графические композиции.
3. Работа с текстом: В Photopea вы можете добавлять текст на изображение, изменять его шрифт, цвет и размер. Вы также можете применять эффекты к тексту, такие как тени, градиенты и т. д.
4. Цветокоррекция и редактирование: Photopea предоставляет возможности для редактирования цветов и тонов изображения. Вы можете настраивать яркость, контраст, насыщенность и тон, чтобы добиться нужного эффекта.
5. Работа с форматами файлов: Photopea поддерживает большое количество форматов файлов, таких как PSD, AI, PDF, PNG, JPEG и другие. Вы можете импортировать и экспортировать изображения в различные форматы, что облегчает работу с другими профессиональными приложениями.
Учетная запись Pro в Photopea открывает дополнительные возможности и инструменты, позволяя создавать сложные фотоэффекты и использовать расширенные функции для масштабирования и редактирования изображений.
Все это делает Photopea мощным и удобным инструментом для профессиональной работы с изображениями.
Photopea
Вы можете использовать его для простых задач, таких как изменение размера изображений, а также для сложных задач, таких как дизайн веб-страниц, создание иллюстраций, обработка фотографий и многое другое.
Семь тысяч человеко-часов, необходимо для создания клона Photoshop, доступного бесплатно в браузере. Для людей, которые не хотят платить за продукт Adobe, но хотят воспользоваться похожей программой, это может быть хорошим предложением.
Photopea бесплатна благодаря показываемой пользователю рекламе. И это не такая уже большая плата за доступ к инструменту, который напоминает Photoshop не только визуально, но и списком инструментов. Его создателем является Иван Кутцир, чешский разработчик, который посвятил свое свободное время созданию Photopea.
Что может сделать Photopea.
Photopea поддерживает слои, позволяет маскировать объекты, применять интеллектуальные объекты, стили слоев, фильтры (включая фильтры искажения изображения), векторные фигуры, настраиваемые кисти, текстовые инструменты, инструменты клонирования, исправление, заполнение выбранных фрагментов изображения. Работа с изображениями происходит в пространстве sRGB, а записанные файлы имеют 8-битную глубину.
Отредактированные изображения могут быть прочитаны и записаны в формате PSD. Существует даже базовая поддержка формата DNG для снимков камеры (этот программный модуль клонов Photoshop, разумеется, наиболее трудно реплицируется).
Проблема многих веб-приложений, которая очень беспокоит пользователей, заключается в необходимости поддерживать сетевое соединение при редактировании изображений. Данные отправляются серверам оператора приложения, где они обрабатываются. Между тем, Photopea требует входа на сайт Photopea.com только для загрузки рабочей среды. Позже весь процесс редактирования происходит локально с использованием ресурсов компьютера пользователя.
Как использовать приложение можете узнать, прочитав руководства на веб-сайте Photopea, но также можно приступить к работе с приложением, как только будут освоены основы Photoshop. Кроме того, в меню во вкладке «больше», а затем в пункте «язык» можно выбрать русский язык. Так же в этой же вкладке, в пункте «тема», можно поменять фон рабочей среды.
Photopea можно запускать на более слабом оборудовании, в отличие от обычного Photoshop, но для работы с большими размерами изображений потребуется достаточный объем оперативной памяти. И уже ставшие обыденными 8 GB, по крайней мере, обеспечивают удобство редактирования. Photopea запускается в любом браузере, но распространенный Chrome может оказаться не лучшим выбором. Лучше пользоваться браузером, который не тратит много ресурсов на свое функционирование.
Photopea также позволяет войти в свою учетную запись. Она используется для синхронизации настроек программы при использовании Photopea на разных устройствах.
Много Photoshop, но не всё.
Конечно, приложению, надо пройти еще долгий путь, прежде чем она станет функционально похожим и с такими же возможностями как у последней версии Photoshop. Во всяком случае, Photopea вероятно, всегда будет немного позади, потому что возможности одного программиста не могут соответствовать возможностям огромной команды Adobe.
И поэтому Photopea можно использовать по случаю или в ситуациях, когда нет возможности добраться до Photoshop. И для многих пользователей то, что они могут сделать сейчас в приложении, будет достаточно полным набором возможностей.
Photopea будет лишена рекламы, будут убраны различные функциональные ограничения, а также включится возможность контакта с разработчиком.
iPiccy
(https://ipiccy.com/)
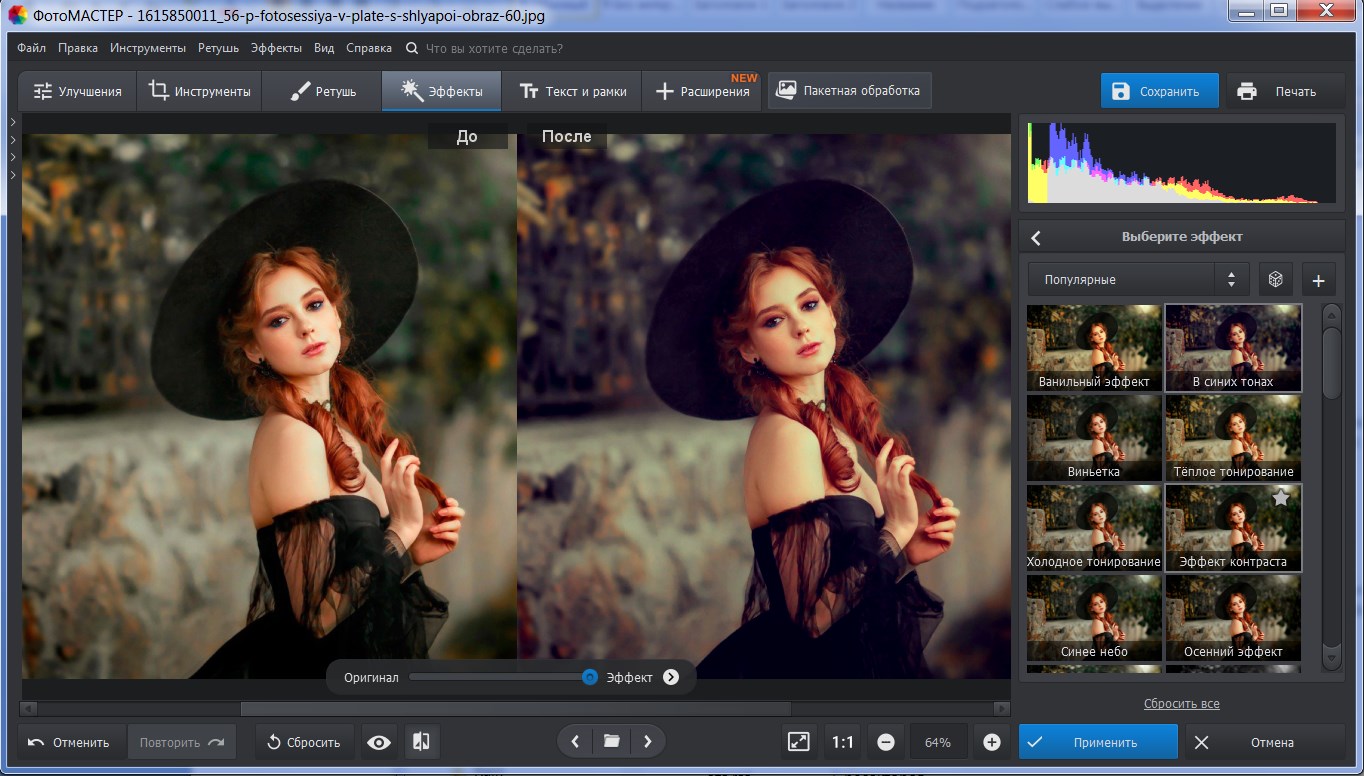
iPiccy предлагает большой арсенал простых в использовании инструментов для редактирования фотографий в браузере. Есть функции автоматической настройки фотографий одним щелчком мыши. В платной подписке — более 100 фотоэффектов.
Есть отдельный инструмент для создания фотоколлажа. В этом инструменте доступно большое количество шаблонов и настроек, которые делают процесс создания коллажа легким и увлекательным. Мы можем легко изменять цвет фона, размер, округлость ячеек и многое другое, чтобы создать настоящий шедевр за секунды!
Еще один раздел iPiccy — онлайн-инструмент для графического дизайна. Добавляем текст, наложения и наклейки, применяем векторные маски и потрясающие текстовые эффекты, чтобы создавать уникальные дизайны для любых целей.
В сервисе можно в любой момент переключаться между редактором фото, инструментом для создания фотоколлажа и инструментом для создания дизайна.
Подходит для новичков и для любителей работать с фото. Всем, кому нужен надежный и удобный инструмент для работы с фото.
![12 лучших бесплатных онлайн-фоторедакторов для использования в 2021 году[+бонус]](https://lakfol76.ru/wp-content/uploads/5/e/a/5ea540b4730db8525143e76b59b59614.png)


Save in the Right Format for Your Needs
So, you’ve edited your image to perfection with Photopea, just like a pro. But before you rush to hit the save button, hold on a second! The format you choose to save your image in can make a big difference. Let’s dive into the specifics.
Understanding Different Image Formats
Not all image formats are created equal. Some are great for keeping your image quality high, while others work better for smaller file sizes. Here’s a quick rundown:
- JPEG: This is a common format perfect for photos. It uses lossy compression, which means some image quality is sacrificed for a smaller file size.
- PNG: Ideal for images with transparent backgrounds. PNG uses lossless compression, ensuring high quality, but results in larger file sizes.
- GIF: Best for small, simple animations. Not recommended for high-quality static images.
Choosing the Right Format in Photopea
So, which format should you pick? It depends on what you need. If you’ve created a sleek logo with a transparent background, PNG is your friend. Sharing a photo on social media? JPEG might be your best bet. Remember, there’s no one-size-fits-all answer—you need to pick the format that fits your specific needs.
To save your image in Photopea, simply click File > Export As, and then choose your preferred format. Then, you can adjust the quality settings if needed. And there you have it—you’re one step closer to mastering how to edit like a pro with Photopea.
If you enjoyed these practical tips for editing with Photopea and want to expand your skills further, consider checking out the workshop ‘Animating with Procreate and Photoshop’ by Nyanza. This workshop will help you learn how to bring your creations to life using animation techniques in Procreate and Photoshop, building upon the editing skills you’ve already developed.
VI. What Are the Tips and Tricks for Getting the Most out of Photopea?
The tips below will help you make the most out of this online tool.
a. Harness the Power of Keyboard Shortcuts
 Credits: author@scijournal.org
If you’re looking to speed up your Photopea experience and streamline your workflow, keyboard shortcuts are your new best friend. Akin to most image editing platforms, Photopea supports a variety of shortcuts that can significantly enhance your efficiency.
For instance, pressing ‘V’ switches to the move tool, ‘B’ calls upon the brush tool, and ‘E’ activates the eraser. With a plethora of other keyboard shortcuts at your disposal, it’s worthwhile to invest some time learning them for a smoother editing journey.
b. Tailor Your Workspace for Optimum Convenience
Photopea boasts a highly customizable workspace designed to cater to your unique needs. Its user-friendly interface allows you to maneuver panels, group them together, or completely hide them based on your preference.
Whether you prefer a minimal workspace or want all the tools and panels at a glance, Photopea gives you complete control over your design environment.
c. Leverage the History Function to Rectify or Revert Changes
 Credits: author@scijournal.org
In the creative process of editing visuals, errors or second thoughts are inevitable. Photopea’s History panel is here to the rescue. This convenient feature records your recent actions, providing you with the ability to return to any previous state of your project.
d. Tap into Photopea’s Rich Learning Resources
To truly unlock Photopea’s full potential, it’s essential to familiarize yourself with its wide array of features and tools. Luckily, Photopea offers an extensive range of online tutorials and resources aimed at empowering users to master the platform.
From basic introductions to advanced techniques, these guides provide a wealth of knowledge that can elevate your Photopea prowess, and consequently, your research visuals.
Here is one of the Photopea tutorials: https://www.youtube.com/watch?v=a3aPaTNV5g4
e. Experiment with Photopea’s Advanced Features
Beyond the basic tools, Photopea is packed with advanced features that can help transform your visuals into professional-quality graphics. With capabilities ranging from layer masks and blending modes to gradient maps and advanced filters, the possibilities are practically endless.
Don’t be afraid to experiment and push the boundaries of your designs. These advanced features, once mastered, can add depth and sophistication to your research visuals.
f. Optimize Image Quality with Photopea’s Export Options
Another area where Photopea shines is its export options. After pouring effort into creating an impactful visual, it’s critical to ensure the final image maintains its quality. Photopea supports multiple file formats including PNG, JPG, SVG, and even PSD.
Depending on your project requirements, you can choose the optimal format to preserve image quality. Additionally, Photopea lets you tweak image resolution and compression settings to strike the perfect balance between quality and file size.
g. Take Advantage of Photopea’s Vector Editing Capabilities
Photopea isn’t just for raster graphics; it’s equally adept at handling vector and raster graphics, making it a versatile tool for your research visual needs.
Its vector editing capabilities allow you to create sharp, scalable graphics, from simple line art to complex diagrams. If you need to create graphs or infographics where precision matters, Photopea’s vector tools will be indispensable.
Photopea vs Photoshop: What to Expect
Some of you may ask this question: “Can I replace Photoshop with Photopea?“.
No. I don’t think so. But…
But I will definitely use Photopea on my work Mac, where I don’t have Photoshop installed. I don’t need Photoshop for any crucial stuff, so for work Photopea would be enough.
I wish I knew about Photopea when I tried using Linux as my main operating system a few years ago. Everyone recommended I try GIMP, but it’s far weaker than Photopea in my opinion.
If you only need to do basic and slightly advanced work on your images, then I reckon Photopea is a great Photoshop alternative.
Photopea deals rather well with large PSD files. For example, I could load a 1.3 GB PSD file with a few dozen layers, and it worked smoothly. I suspect that’s because Photopea uses WebGL for hardware GPU acceleration, so it can take advantage of my not so powerful NVIDIA RTX 3050 graphics card.
A word on output rendering quality. I’ve tried opening and saving a few simple PSD files with both Photoshop and Photopea, then saved the files back to PSD.
Comparing the results side-by-side reveals minor differences, most visible in text rendering. You won’t get identical results, even if Photopea supports the PSD format.
More complex PSD files created with the latest Photoshop versions may have even bigger issues.
What I’m trying to say is that Photopea may be a very competent alternative to Photoshop for home use, but it’s not meant for a production environment. I wouldn’t use Photopea for collaboration with someone who uses Photoshop.
Don’t agree with me? I tried loading a PSB file, a PSD derived format for large files, supported by Photopea, and the app was stuck at loading the 2.4 GB file. I’m not sure if it’s because of the large size or because the file used artboards, a relatively new Photoshop feature.
I could still use the app, no problem, but the loading overlay didn’t disappear, and the file could not be open, even after waiting patiently for 10 minutes.